My blog has been moved to ariya.ofilabs.com.

Thursday, June 30, 2011

quaternion multiplication: two years later

Sometime back I wrote (fun fact: it's Google first hit for faster quaternion multiplication) about my favorite commit I did exactly two years ago to Qt :

git show cbc22908
commit cbc229081a9df67a577b4bea61ad6aac52d470cb
Author: Ariya Hidayat 
Date:   Tue Jun 30 11:18:03 2009 +0200

    Faster quaternion multiplications.
    
    Use the known factorization trick to speed-up quaternion multiplication.
    Now we need only 9 floating-point multiplications, instead of 16 (but
    at the cost of extra additions and subtractions).

Ages ago, during my Ph.D research, when I worked with a certain hardware platform (hint: it's not generalized CPU), minimizing the needed number of hardware multipliers with a very little impact in the computation speed makes a huge different. With today's advanced processor architecture armed with vectorized instructions and a really smart optimizing compiler, there is often no need to use the factorized version of the multiplication.

Side note: if you want to like quaternion, see this simple rotatation quiz which can be solved quite easily once you know quaternion.

I try to apply the same trick to PhiloGL, an excellent WebGL framework from Nicolas. Recently, to my delight, he added quaternion support to the accompanying math library in PhiloGL. I think this is a nice chance to try the old trick, as I had the expectation that reducing the number of multiplications from 16 to just 9 could give some slight performance advantage.

It turns out that it is not the case, at least based on the benchmark tests running on modern browsers with very capable JavaScript engine. You can try the test yourself at jsperf.com/quaternion-multiplication. I have no idea whether this is due to JSPerf (very unlikely) or it's simply because the longer construct of the factorized version does not really speed-up anything. If any, seems that the amount of executed instruction matters more than whether addition is much faster than multiplication. And of course, we're talking about modern CPU, the difference is then becoming more subtle.

With the help of Nicolas, I tried various other tricks to help the JavaScript engine, mainly around different ways to prepare the persistent temporary variables: using normal properties, using Array, using Float32Array (at the cost of precision). Nothing leads to any significant improvement.

Of course if you have other tricks in your sleeve, I welcome you to try it with the benchmark. Meanwhile, let's hope that someday some JavaScript engine will run the factorized version faster. It's just a much cooler way to multiply quaternions!

Monday, June 27, 2011

progressive rendering via tiled backing store

Imagine you have to create a CAD-grade application, e.g. drawing the entire wireframe of a space shuttle or showing the intricacies of 9-layer printed circuit board. Basically something that involves a heavy work to display the result on the screen. On top of that, the application is still expected to perform smoothly in case the user wants to pan/scroll around and zoom in/out.

The usual known trick to achieve this is by employing a backing store, i.e. off-screen buffer that serves as the target for the drawing operations. The user interface then takes the backing store and displays it to the user. Now panning is a matter of translation and zooming is just scaling. The backing store can be updated asynchronously, thus making the user interaction decoupled from the complexity of the rendering.

Moving to a higher ninja level, the backing store can be tiled. Instead of just one giant snapshot of the rendering output, it is broken down to small tiles, say 128x128 pixels. The nice thing is because each tile can be mapped as a texture in the GPU, e.g. via glTexImage2D. Drawing each textured tile is also a (tasty) piece of cake, GL_QUAD with glBindTexture.

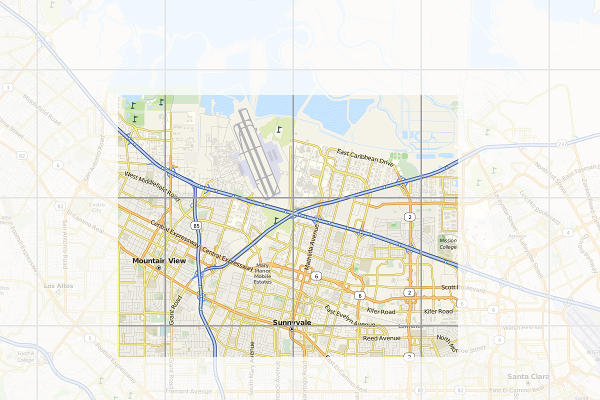
Another common use-case for tiling is for online maps. You probably use it every day without realizing it in Google Maps, OpenStreetMap, or other similar services. In this case, the reason is to use tiles is mainly to ease the network aspect. Instead of sending a huge image representing the area seen by the user in the viewport, actually lots of small images are transported and stitched together by the client code in the web browser.

Here is an illustration of the concept. The border of each tile is emphasized. The faded area is what you don't see (outside the viewport). Of course every time you pan and zoom, new fresh tiles are fetched so as to cover the viewport as much as possible.

When I started to use the first generation iPhone years ago, I realized that the browser (or rather, its WebKit implementation) uses the very similar trick. Instead of drawing the web page straight to the screen, it uses a tiled backing store. Zooming (via pinching) becomes really cheap, it's a matter of scaling up and down. Flicking is the same case, translating textures does not bother any mobile GPU that much.

Every iOS users know that if you manage to beat the browser and flick fast enough, it tries to catch up and fills the screen as fast as possible but every now and then you'll see some sort of checkerboard pattern. That is actually the placeholder for tiles which are not ready yet.

Since all the geeks out there likely better understand the technique with a piece of code, I'll not waste more paragraphs and present you this week's X2 example: full-featured implementation of tiled backing store in < 500 lines of Qt and C++. You can get the code from the usual X2 git repository, look under graphics/backingstore. When you compile and launch it, use mouse dragging to pan around and mouse wheel to zoom in/out. For the impatient, see the following 50-second screencast (or watch directly on YouTube):

For this particular trick, what you render actually does not matter much (it could be anything). To simplify the code, I do not use WebKit and instead just focus on SVG rendering, in particular of that famous Tiger head. The code should be pretty self-explanatory, especially for the TextureBuffer class, but here is some random note for your pleasure.

At the beginning, every tile is invalid (=0). Every time the program needs to draw a tile, it checks first if the tile is valid or not. If yes, it substitutes it with the checkerboard pattern instead (also called the default texture) and triggers an asynchronous update process. During the update, the program looks for the most important tile which needs to be updated (usually the one closes to the viewport center). What is a tile update? It's the actual rendering of the SVG, clipped exactly to the rectangular bounding box represented by the tile, into a texture.

To show the mix-n-match, I actually use Qt built-in software rasterizer to draw the SVG. That demonstrates that, even though each tile is essentially an OpenGL texture, you are not forced to use OpenGL to prepare the tile itself. This is essentially mixing rasterization done by the CPU with the texture management handled by the GPU.

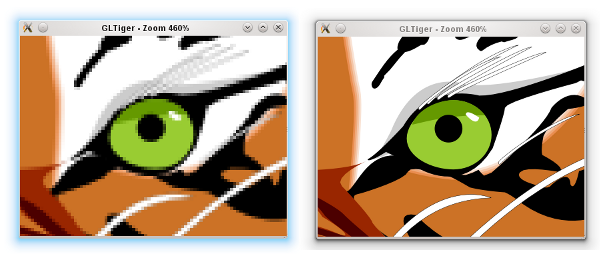
As I mentioned before, panning is a matter of adjusting the translation offset. Zooming is tricky, it involves scaling up (or down) the textures appropriately. At the same time, it also triggers an asynchronous refresh. The refresh function is nothing but to reset all the tiles to invalid again, which in turns would update each one by one. This gives the following effect (illustrated in the screenshot below). If suddenly you zoom in, you would see pixelated rendering (left). After a certain refresh delay, the tile update makes the rendering crisp again (right).

Zooming GLTiger

Because we still need to have the outdated tiles scaled up/down (those pixelated ones), we have to keep them around for a while until the refresh process is completed. This is why there is another texture buffer called the secondary background buffer. Rest assured, when none of the tiles in the background buffer is needed anymore, the buffer is flushed.

If you really want to follow the update and refresh, try to uncomment the debug compiler define. Beside showing the individual tiles better, that flag would also intentionally slows down both update and refresh so your eyes can have more time to trace them.

BTW how would you determine the tile dimension in pixels? Unfortunately this can vary from one hardware to another. Ideally it's not too small because you'd enjoy the penalty of logical overdraw. If it's too large, you might not be progressive enough. Trial and error, that can be your enlightenment process.

Being an example, this program has a lot of simplifications. First of all, usually you want the tile update to take place in a separate thread, and probably updating few tiles at once. With a proper thread affinity, this helps improving the overall perceptive smoothness. Also, in case you know upfront that it does not impact the performance that much, using texture filtering (instead of just GL_NEAREST) for the scaling would give a better zooming illusion.

You might also see that I decided not to use the tile cache approach in the texture buffer. This is again done for simplicity. The continuous pruning of unused textures ensures that we actually don't grow the textures and kill the GPU. If you really insist on the absolutely minimal amount of overdraw and texture usage, then go for a slightly complicated cache system.

Since I'm lazy, the example is using Open GL and quad drawing. If you want to run it on a mobile platform, you have patch it so that it works with Open GL ES. In all cases, converting it to use vertex and texture arrays is likely a wise initial step. While you are there, hook the touch events so you can also do the pinch-to-zoom effect.

If you are brave enough, here is another nice final finish (as suggested by Nicolas of InfoVis and PhiloGL fame). When you zoom in, the tiles in the center are prioritized. However, when you zoom out, the tiles nearby the viewport border should get the first priority, in order to fill the viewport as fast as possible.

Progressive rendering via a tiled backing store is the easiest way to take advantage of graphics processor. It's of course just one form, probably the simplest one, of hardware acceleration.

Friday, June 10, 2011

your webkit port is special (just like every other port)

One of the most often question I got, "Since browser Foo and browser Bar are using the same WebKit engine, why do I get different feature set?".

Let's step aside a bit. Boeing 747, a very popular airliner, uses Pratt & Whitney JT9D engine. So does Airbus A310. Do you expect both planes to have the same flight characteristics? Surely not, there are other bazillion factors which decide how that big piece of metal actually flies. In fact, you would not expect A310-certified pilot to just jump into 747 cockpit and land it.

(Aviation fans, please forgive me if the above analogy is an oversimplification).

WebKit, as a web rendering engine, is designed to use a lot of (semi)abstract interfaces. These interfaces obviously require (surprise) some implementation. Example of such interfaces are network stack, mouse + key handling, thread system, disk access, memory management, graphics pipeline, etc.

What is the popular reference to WebKit is usually Apple's own flavor of WebKit which runs on Mac OS X (the first and the original WebKit library). As you can guess, the various interfaces are implemented using different native libraries on Mac OS X, mostly centered around CoreFoundation. For example, if you specify a flat colored button with specific border radius, well WebKit knows where and how to draw that button. However, the final actual responsibility of drawing the button (as pixels on the user's monitor) falls into CoreGraphics.

With time, WebKit was "ported" into different platform, both desktop and mobile. Such flavor is often called "WebKit port". For Safari Windows, Apple themselves also ported WebKit to run on Windows, using the Windows version of its (limited implementation of) CoreFoundation library.

Beside that, there were many other "ports" as well (see the full list). Via its Chrome browser (and the Chromium sister project), Google has created and continues to maintain its Chromium port. There is also WebKitGtk which is based on Gtk+. Nokia (through Trolltech, which it acquired) maintains the Qt port of WebKit, popular as its QtWebKit module.

(This explains why any beginner scream like "Help! I can't build WebKit on platform FooBar" would likely get an instant reply "Which port are you trying to build?").

Consider QtWebKit, it's even possible (through customized QNetworkAccessManager, thanks to Qt network modularity) to hook a different network backend. This is for example what is being done for KDEWebKit module so that it becomes the Qt port of WebKit which actually uses KDE libraries to access the network.

If we come back to the rounded button example, again the real drawing is carried out in the actual graphics library used by the said WebKit port. Here is a simplified diagram that shows the mapping:

GraphicsContext is the interface. All other code inside WebKit will not "speak" directly to e.g. CoreGraphics on Mac. In the above rounded button example, it will call GraphicsContext's fillRoundedRect() function.

There are various implementation of GraphicsContext, depending on the port. For Qt, you can see how it is done in GraphicsContextQt.cpp file.

Should you know a little bit about graphics, you would realize that there are different methods and algorithms to rasterize a filled rounded rectangle. A certain approach is to convert it to a fill polygon, another one is to scanline-convert the rounded corner directly. A fully GPU-based system may prefer working with tessellated triangle strips, or even with shader. Even the antialiasing level defines the outcome, too.

In short, different graphic stacks with different algorithm may not produce the same result down to the exact pixel colors. It all depends various factors, including the complexity of the drawing itself.

Now the same concept applies to other interfaces. For example, there is no HTTP stack inside WebKit code base. All network-aware code calls specific function to get resources off the server, post some data, etc. However, the actual implementation is in system libraries. Thus, don't bother trying to find SSL code inside WebKit.

This gets us to this question, "If browser X is using WebKit, why it does not have feature Z?". You may be able to deduce the reason. Imagine a certain graphic stack which glues GraphicsContext for that platform does not implement fillRoundedRect() function, what would happen? Yes, your rounded button suddenly becomes a square button.

As a matter of fact, when someone ports WebKit to a new platform, she will need to implement all these interfaces one by one. Until it is complete, of course not everything would work 100% and most likely only the basics are there. That should feel like putting a jet engine into an airframe that can't fly yet.

"Can we have one de-facto graphics stack that powers WebKit so we always have pixel-perfect rendering expectation?" Technically yes, but practically no. In fact, while Boeing and Airbus may buy the same engine from Pratt & Whitney, they may not want to have the exact same landing gears. Everyone of us wants to be special. A certain system wants to use OpenGL ES, squeeze the best performance out of it and doesn't really care if the selling price goes up. Others want to sacrifice the speed, trim the silicon floor and make the device more affordable. More often, you just have to live with diversity.

And if you want to put aside all the differences, two WebKit ports of the same revision share tons of stuff, especially if they use the same JavaScript engine. They will parse HTML and CSS in the same way, produce the same DOM, yield the same render tree, have the same JavaScript host objects, and so on.

Thus, next time someone shouts "there is no two exact WebKit", you know the story behind it.

Monday, June 06, 2011

rectangular gradient

Thorsten Zachmann, from Calligra (and previously KOffice) fame, asked me once on how to draw a different kind of gradient: a rectangular one. While Qt itself has built-in supports for linear, radial, and conical gradient types, apparently for office apps we may need more than that. In short, the goal is creating the following:

It turns out that this is not so difficult at all, about 50 lines of code. Check it out at the usual X2 repository and find it under graphics/rectgradient.

Basically it boils down to a two-step process, as illustrated below. The first one is easy, just create a linear gradient from the center going north and south. The second one is similar, but now we are going east and west and clip it to two triangles. Once we combined both, we get the rectangular gradient.

Have fun with the gradient!