My blog has been moved to ariya.ofilabs.com.
Showing posts with label svg. Show all posts

Monday, June 27, 2011

progressive rendering via tiled backing store

Imagine you have to create a CAD-grade application, e.g. drawing the entire wireframe of a space shuttle or showing the intricacies of 9-layer printed circuit board. Basically something that involves a heavy work to display the result on the screen. On top of that, the application is still expected to perform smoothly in case the user wants to pan/scroll around and zoom in/out.

The usual known trick to achieve this is by employing a backing store, i.e. off-screen buffer that serves as the target for the drawing operations. The user interface then takes the backing store and displays it to the user. Now panning is a matter of translation and zooming is just scaling. The backing store can be updated asynchronously, thus making the user interaction decoupled from the complexity of the rendering.

Moving to a higher ninja level, the backing store can be tiled. Instead of just one giant snapshot of the rendering output, it is broken down to small tiles, say 128x128 pixels. The nice thing is because each tile can be mapped as a texture in the GPU, e.g. via glTexImage2D. Drawing each textured tile is also a (tasty) piece of cake, GL_QUAD with glBindTexture.

Another common use-case for tiling is for online maps. You probably use it every day without realizing it in Google Maps, OpenStreetMap, or other similar services. In this case, the reason is to use tiles is mainly to ease the network aspect. Instead of sending a huge image representing the area seen by the user in the viewport, actually lots of small images are transported and stitched together by the client code in the web browser.

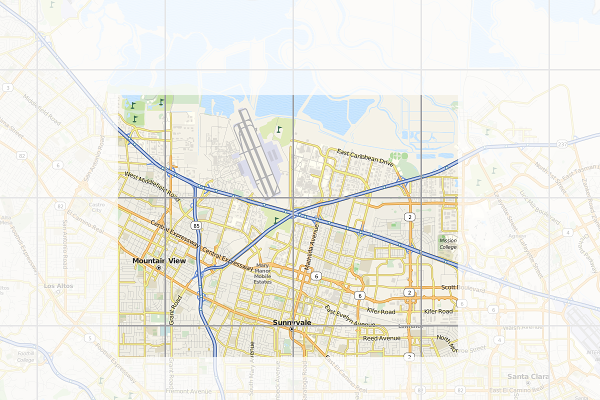
Here is an illustration of the concept. The border of each tile is emphasized. The faded area is what you don't see (outside the viewport). Of course every time you pan and zoom, new fresh tiles are fetched so as to cover the viewport as much as possible.
When I started to use the first generation iPhone years ago, I realized that the browser (or rather, its WebKit implementation) uses the very similar trick. Instead of drawing the web page straight to the screen, it uses a tiled backing store. Zooming (via pinching) becomes really cheap, it's a matter of scaling up and down. Flicking is the same case, translating textures does not bother any mobile GPU that much.

Every iOS users know that if you manage to beat the browser and flick fast enough, it tries to catch up and fills the screen as fast as possible but every now and then you'll see some sort of checkerboard pattern. That is actually the placeholder for tiles which are not ready yet.

Since all the geeks out there likely better understand the technique with a piece of code, I'll not waste more paragraphs and present you this week's X2 example: full-featured implementation of tiled backing store in < 500 lines of Qt and C++. You can get the code from the usual X2 git repository, look under graphics/backingstore. When you compile and launch it, use mouse dragging to pan around and mouse wheel to zoom in/out. For the impatient, see the following 50-second screencast (or watch directly on YouTube):

For this particular trick, what you render actually does not matter much (it could be anything). To simplify the code, I do not use WebKit and instead just focus on SVG rendering, in particular of that famous Tiger head. The code should be pretty self-explanatory, especially for the TextureBuffer class, but here is some random note for your pleasure.

At the beginning, every tile is invalid (=0). Every time the program needs to draw a tile, it checks first if the tile is valid or not. If yes, it substitutes it with the checkerboard pattern instead (also called the default texture) and triggers an asynchronous update process. During the update, the program looks for the most important tile which needs to be updated (usually the one closes to the viewport center). What is a tile update? It's the actual rendering of the SVG, clipped exactly to the rectangular bounding box represented by the tile, into a texture.

To show the mix-n-match, I actually use Qt built-in software rasterizer to draw the SVG. That demonstrates that, even though each tile is essentially an OpenGL texture, you are not forced to use OpenGL to prepare the tile itself. This is essentially mixing rasterization done by the CPU with the texture management handled by the GPU.

As I mentioned before, panning is a matter of adjusting the translation offset. Zooming is tricky, it involves scaling up (or down) the textures appropriately. At the same time, it also triggers an asynchronous refresh. The refresh function is nothing but to reset all the tiles to invalid again, which in turns would update each one by one. This gives the following effect (illustrated in the screenshot below). If suddenly you zoom in, you would see pixelated rendering (left). After a certain refresh delay, the tile update makes the rendering crisp again (right).
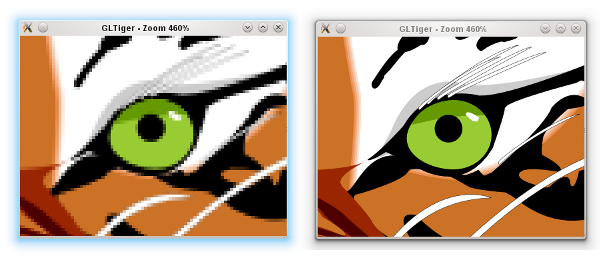
Zooming GLTiger

Because we still need to have the outdated tiles scaled up/down (those pixelated ones), we have to keep them around for a while until the refresh process is completed. This is why there is another texture buffer called the secondary background buffer. Rest assured, when none of the tiles in the background buffer is needed anymore, the buffer is flushed.

If you really want to follow the update and refresh, try to uncomment the debug compiler define. Beside showing the individual tiles better, that flag would also intentionally slows down both update and refresh so your eyes can have more time to trace them.

BTW how would you determine the tile dimension in pixels? Unfortunately this can vary from one hardware to another. Ideally it's not too small because you'd enjoy the penalty of logical overdraw. If it's too large, you might not be progressive enough. Trial and error, that can be your enlightenment process.

Being an example, this program has a lot of simplifications. First of all, usually you want the tile update to take place in a separate thread, and probably updating few tiles at once. With a proper thread affinity, this helps improving the overall perceptive smoothness. Also, in case you know upfront that it does not impact the performance that much, using texture filtering (instead of just GL_NEAREST) for the scaling would give a better zooming illusion.

You might also see that I decided not to use the tile cache approach in the texture buffer. This is again done for simplicity. The continuous pruning of unused textures ensures that we actually don't grow the textures and kill the GPU. If you really insist on the absolutely minimal amount of overdraw and texture usage, then go for a slightly complicated cache system.

Since I'm lazy, the example is using Open GL and quad drawing. If you want to run it on a mobile platform, you have patch it so that it works with Open GL ES. In all cases, converting it to use vertex and texture arrays is likely a wise initial step. While you are there, hook the touch events so you can also do the pinch-to-zoom effect.

If you are brave enough, here is another nice final finish (as suggested by Nicolas of InfoVis and PhiloGL fame). When you zoom in, the tiles in the center are prioritized. However, when you zoom out, the tiles nearby the viewport border should get the first priority, in order to fill the viewport as fast as possible.

Progressive rendering via a tiled backing store is the easiest way to take advantage of graphics processor. It's of course just one form, probably the simplest one, of hardware acceleration.

Sunday, January 23, 2011

PhantomJS: minimalistic headless WebKit-based JavaScript-driven tool

PhantomJS is a headless WebKit packaged as a JavaScript-driven tool. It can be used in command-line utilities which requires web stack, or even as the basis for testing rich web application. It uses WebKit in a headless mode, so you get access to the real native and fast implementation (not a simulated environment) of various standards such as DOM, CSS selector, Canvas, SVG, and many others.

The project page contains a bunch of examples, from easy ones to some more complicated uses. Feel free to contribute more examples!

Let's look at one of the examples, the page rasterizer (yes, it's only 16 lines!):

if (phantom.state.length === 0) {
    if (phantom.args.length !== 2) {
        console.log('Usage: rasterize.js URL filename');
        phantom.exit();
    } else {
        var address = phantom.args[0];
        phantom.state = 'rasterize';
        phantom.viewportSize = { width: 600, height: 600 };
        phantom.open(address);
    }
} else {
    var output = phantom.args[1];
    phantom.sleep(200);
    phantom.render(output);
    phantom.exit();
}

If I want to have the famous PostScript tiger from its SVG source, all I have to do is to run:

phantomjs rasterize.js http://ariya.github.com/svg/tiger.svg tiger.png

But static vector graphic is boring. Replacing the above with

phantomjs rasterize.js http://raphaeljs.com/polar-clock.html clock.png

gives me Polar Clock, one notable example from RaphaelJS.

Should you need to deal with JSONP, process XML, and integrate with YQL, that's all easily done. Again, refer to the various service integration examples. Let me show one example, which is actually my favorite:

if (phantom.state.length === 0) {
    var origin, dest;
    if (phantom.args.length < 2) {
        console.log('Usage: direction.js origin destination');
        console.log('Example: direction.js "San Diego" "Palo Alto"');
        phantom.exit(1);
    }
    origin = phantom.args[0];
    dest = phantom.args[1];
    phantom.state = origin + ' to ' + dest;
    phantom.open(encodeURI('http://maps.googleapis.com/maps/api/directions/xml?origin='
        + origin +  '&destination=' + dest + 
        '&units=imperial&mode=driving&sensor=false'));
} else {
    if (phantom.loadStatus === 'fail') {
        console.log('Unable to access network');
    } else {
        var steps;
        steps = phantom.content.match(/<html_instructions>(.*)<\/html_instructions>/ig);
        if (steps == null) {
            console.log('No data available for ' + phantom.state);
        } else {
            steps.forEach(function (ins) {
                ins = ins.replace(/\&lt;/ig, '<').replace(/\&gt;/ig, '>');
                ins = ins.replace(/\<div/ig, '\n<div');
                ins = ins.replace(/<.*?>/g, '');
                console.log(ins);
            });
        }
    }
    phantom.exit();
}

If I run it like the following:

phantomjs direction.js 'Redwood City' 'Sunnyvale'

what I got is the complete driving direction:

Head east on Broadway toward El Camino Real
Take the 1st left onto El Camino Real
Turn right at Whipple Ave
Slight right to merge onto US-101 S toward San Jose
Take exit 398B to merge onto CA-85 S toward Santa Cruz/Cupertino
Take exit 22A to merge onto CA-82 S/E El Camino Real toward Sunnyvale
Destination will be on the right

Map data ©2011 Google

Make sure you check out other examples, such as getting weather forecast conditions, finding pizza in New York, looking up approximate location based on IP address, pulling the list of seasonal food, displaying tweets, and many others.

Headless execution of any web content also enables fast unit testing. Obviously, the goal is not to replace comprehensive, cross-browser framework such as Selenium or Squish for Web. Rather, it serves a quick sanity check just before you check in some changes.

Since this can happen automatically and does not need to launch any browser, even better, you can hook the test so that it executes right before a commit and actually prevents the commit if any of the test fails. It is easily done using git via its hook support. This is something I have written at Sencha blog. It demonstrated precommit hook with Jasmine, but technically it can work with any test framework.

I have been working on and off on PhantomJS for the past few years. You may be already familiar with some of its inspiration (also involving headless WebKit): SVG rasterizer, page capture, visual Google, etc. Finally I managed to overcome my laziness, cleaned up the code, and published it for your pleasure. Obviously it's not a surprise if you find out that PhantomJS uses QtWebKit.

I got a few tasks for next PhantomJS version 1.1. You are encouraged to file bugs and feature requests in the said issue tracker.

Get it while it is hot!

Friday, September 11, 2009

SVG: parsing and content optimization

A few weeks ago, just for a change (between the usual QtWebKit bug-fixing and patches juggling), I did take a look at our QtSvg module. According to some internal reports, QtSvg is not fast enough when parsing a large and complicated SVG. Of course, slow is relative, slow to what. And arguably, parsing time is not as important as rendering time. But if you stash your user-interface elements in some sort of SVG theme, loading time becomes a factor (caching the pixmaps whenever possible also helps). Of course, reduced size served in a web server can decrease the bandwidth as well (think of all the SVGs in Wikipedia).

Still, I decided to have a look, just in case there are low-hanging fruits I can grab. And I was right, far from being an SVG expert, with just two days of work I managed to squeeze its performance a bit, which you'd enjoy already in the recent 4.6 preview.

The chart above - shorter is better - represents the comparison of the time spent in QSvgRenderer::load(), measured using CPU tick counter (in millions of ticks), comparing Qt 4.5 and 4.6. I also tested some other files as well, see the bigger bar charts. In all measurements, the 95% confidence intervals were well below 1%. In-house Theme refers to an internal SVG that unfortunately I can't share. Tiger is the SVG version of the famous head in PostScript (taken from GNU GhostScript), something I have shown before. Imperial Coat of Arms of France is another complex SVG, from Wikipedia Commons. World Map is the public domain blank grayscale world map from Wikipedia. There are a bunch of other test files I used, they mostly show the same improvements.

As you can see, Qt 4.6 would enjoy a bit of speed-up (in some cases up to 1.4x) when loading and parsing SVG.

However, I did not stop there. For the fun of it, I quickly hacked a Qt-based, command line SVG minifier, dubbed SVGMin. More about it can be read in the detailed Quick Start, but basically it tries to eliminate redundant garbages which have no effect whatsoever in the final rendering.

What follows is the chart showing the same type of measurement but I added the result with the minified SVG (see also the full comparison chart). The result should speak for itself:

I plan some more improvements to the SVG minifier, for example collapsing a single grouped element (<g><path ...></g> makes no sense), group a bunch of nodes with similar attributes (no need to duplicate the same fill colors over 100 circles), remove useless attributes (why there is fill-* for fill:none?), and many others. Hold your breath.

Wednesday, August 06, 2008

svg-to-png using (Qt)WebKit

Related to the recent discussion on some problems of Qt SVG renderer when drawing the Oxygen icons, I decided to sit down and wrote an example of yet-another SVG renderer by using QtWebKit (available since Qt 4.4.0). Check out the code if you're interested, it is part of the Graphics Dojo examples.

The major difference between this WebKit-based tool compared to QSvgRenderer is that it should handle SVG features which are supported by WebKit. Note that QtSvg limits itself only to SVG Tiny 1.2 without DOM API and scripting (due to various reasons). On the other hand, SVG support in WebKit will be improved over the time. Yes, fancy stuff like filter effects are not fully implemented yet (at least, in QtWebKit), but we are working towards that.

For those who can't wait for the DOM API in QtWebKit, you can see the example of poor man's way of doing it, i.e. by (ab)using evaluateJavaScript() of a web frame. Here it is used to get the SVG width and height attributes. As a hint, if you are unsure about the DOM tree, its elements and/or their attributes, then open the SVG in e.g. Arora or the Demo Browser and use the Web Inspector to check it. The JS console is also helpful to try out various thing right when you view the SVG.

Obligatory screenshot follows:

Result of WebKit-based SVG rasterizer

And while you are there, check out also other fresh dojo examples: zooming text and old-school radial blur.