My blog has been moved to ariya.ofilabs.com.
Showing posts with label coding. Show all posts

Wednesday, July 06, 2011

fluid animation with accelerated composition

Those who work on web-based applications on mobile platforms often recall the advice, "Use translate3d to make sure it's hardware accelerated". This advice seems magical at first, and I seldom find anyone who explains (or wants to explain) the actual machinery behind such a practical tip.

For a while, Safari (and Mobile Safari) was the only WebKit-based browser which supports hardware-accelerated CSS animation. Google Chrome caught up, QtWebKit-powered browser (like the one in Nokia N9) also finally supported it. Such a situation often gave the wrong impression that Apple kept the hardware-acceleration code for themselves.

The above two are basically the reasons for this blog post.

In case you miss it (before we dive in further), please read what I wrote before about different WebKit ports (to get the idea of implementation + back-end approach) and tiled backing store (decoupling web page complexity with smooth UX). The GraphicsContext abstraction will be specially useful in this topic. In particular, because animation is tightly related to efficient graphics.

Imagine if you have to move an image (of a unicorn, for example) from one position to another. The pseudo-code for doing it would be:

  for pos = startPosition to endPosition
    draw unicorn at pos

To ensure smooth 60fps, your inner loop has only 16 ms to draw that unicorn image. Usually this is a piece of cake because all the CPU does is sending the pixels of the unicorn image once to the GPU (in the form of texture) and then just refer the texture inside the animation loop. No heavy work is needed on the CPU and GPU sides.

If, however, what you draw is very complicated, e.g. formatted text consisting of different font typefaces and sizes, this gets hairy. The "draw" part can take more than 16 ms and the animation is not butter-smooth anymore. Because your text does not really change during the animation, only the position changes, the usual trick is to cache the text, i.e. draw it onto a buffer and just move around the buffer as needed. Again, the CPU just needs to push the buffer the GPU once:

    prepare a temporary buffer
    draw the text onto the buffer
    for pos = startPosition and endPosition
       set a new transformation matrix for the buffer

As you can imagine, that's exactly what happens when WebKit performs CSS animation. Instead of drawing your div (or whatever you animate) multiple times in different position, it prepares a layer and redirect the drawing there. After that, animation is a simple matter of manipulating the layer, e.g. moving it around. WebKit term for this (useful if you comb the source code) is accelerated composition accelerated compositing.

Side note: Mozilla has the same concept, available since Firefox 4, called Layer.

If you understand immediate vs retain mode rendering, non-composited vs composited is just like that. The idea to treat the render tree more like a scene graph, a stack of layers with different depth value.

Because composition reduces the computation burden (GPU can handle varying transformation matrix efficiently), the animation is smoother. This is not so noticeable if you have a modern machine. In the following video demo (http://youtu.be/KujWTTRkPkM), I have to use my slightly old Windows laptop to demonstrate the frames/second differences:

The excellent falling leaves animation is something you have seen before, back when WebKit support for CSS animation was announced.

Accelerated composition does not magically turn every WebKit ports capable of doing fluid animation. Analog to my previous rounded corner example, composition requires the support from the underlying platform. On Mac OS X port of WebKit, composition is mapped into CoreAnimation (part of CoreGraphics), the official API to have animated user interface. Same goes for iOS WebKit. On Chromium, it is hooked into sandboxed GPU process.

With QtWebKit, composition is achieved via Graphics View framework (read Noam's explanation for details). The previous video you have seen was created with QtWebKit, running without and with composition, i.e. QGraphicsWebView with different AcceleratedCompositingEnabled run-time setting. If you want to check out the code and try it yourself, head to the usual X2 repository and look under webkit/composition. Use spacebar (or mouse click) to switch between composited and non-composited mode. If there is no significant frame rate improvement, increase NUMBER_OF_LEAVES in leaves.js and rebuild. When compositing is active, press D to draw thin yellow border around each layer. Since it's all about Graphics View, this debugging is easy to implement. I just inject a custom BorderEffect, based on QGraphicsEffect (which I did prototype back when I was with Nokia):

Thus, there is nothing like hidden secret with respect to Safari hardware-accelerated CSS support. In fact, Safari is not different than other Mac apps. If you compile WebKit yourself and build an application with it, you would definitely get the animation with hardware acceleration support.

As the bonus, since Mac and iOS WebKit delegate the animation to CoreAnimation (CA), you can use various CA tweaks to debug it. CA_COLOR_OPAQUE=1 will emphasize each layer with red color overlay (as in the demo). While this applies to any CA-based apps (not limited to WebKit or Safari), it's still very useful nevertheless. Chromium's similar feature is --show-composited-layer-border command line option.

How does WebKit determine what to composited? Since the goal is to fully take advantage of the GPU, there are few particular operations which are suitable for such a composition. Among others are transparency (opacity < 1.0) and transformation matrix. Ideally we would just use composition for the entire web page. However, composition implies a higher memory allocation and a quite capable graphics processor. On mobile platforms, these two translate into additional critical factor: power consumption. Thus, one just needs to draw a line somewhere and stick with it. Hence, that's why currently (on iOS) translate3d and scale3d are using composition and their 2-D counterparts are not. Addendum: on the desktop WebKit, all transformed element is accelerated, regardless whether it's 2-D or 3-D.

If you make it this far, here are few final twists.

First of all, just like the tiled backing store approach I explained before, accelerated composition does not force you to use the graphics processor for everything. For efficiency, your layer (backing store) might be mapped to GPU textures. However, you are not obligated to prepare the layer, i.e. drawing onto it, using the GPU. As an example, you can use a software rasterizer to draw to a buffer which will be mapped to OpenGL texture.

In fact, a further variation of this would be not to use the GPU at all. This may come as a surprise to you but Android 2.2 (Froyo) added composition support (see the commit), albeit doing everything with in software (via its Skia graphics engine). The advantage is of course not that great (compared to using OpenGL ES entirely), however the improvement is really obvious. If you have two Android phones (of the same hardware specification), one still running the outdated 2.1 (Eclair) and the other with Froyo, just open the Falling Leaves demo and watch the frame rate difference.

With the non-GPU composition-based CSS animation in Froyo, translate3d and other similar tricks do not speed-up anything significantly. In fact, it may haunt you with bugs. For example, placing form elements in a div could wreck the touch events accuracy, mainly because the hit test procedures forget to take into account that the composited layer has moved. Things which seem to work just fine Eclair may start behaving weird under Froyo and Gingerbread. If that happens to you, check your CSS properties.

Fortunately (or unfortunately, depending on your point of view), Android madness with accelerated composition is getting better with Honeycomb and further upcoming releases. Meanwhile, just take it for granted that your magical translate3d spell has no effect on the green robots.

Last but not least, I'm pretty excited with the lightweight scene graph direction in the upcoming Qt 5. If any, this will become a better match for QtWebKit accelerated composition compared to the current Graphics View solution. This would totally destroy the myth (or misconception) that only native apps can take advantage of OpenGL (ES). Thus, if you decide to use web technologies via QtWebKit (possibly through the hybrid approach), your investment would be future-attractive!


Sunday, July 03, 2011

birds of paradise

bird of paradise

PhantomJS, the headless QtWebKit tool, is now listed as one of the Qt Ambassador show cases. There is also a growing list of projects using PhantomJS (let me know if you want to be listed). In fact, PhantomJS running in several Amazon EC2 instances is used as the primary tool in a web security analysis.

Few days ago, right during the summer solstice, I tagged and released PhantomJS 1.2, codenamed Birds of Paradise. There are some exciting changes there that I will briefly outline as follows (for details, see the Release Notes).

Most important change is the fix to the security model. Your PhantomJS script now does not run in the context of the loaded QWebPage anymore (more precisely, the main frame thereof). Rather, we have a new WebPage object that abstracts (surprise) the web page. This forces a major breakage in the API since there is no way to support 1.1 style of API with the same code. Again, check the Release Notes to find out how to migrate your script.

The bonus with the above WebPage object abstraction is a bunch of external callbacks we can set up, most notably onLoadStarted and onLoadFinished, useful to trigger some actions upon page loading. Speaking of JavaScript evaluation, dynamic script tag loading is a quite popular trick to asynchronously load external libraries, e.g. those part of Google Libraries API. Rather than writing your own code, there is now easy-to-use includeJS() function for that specific purpose.

My personal #1 favorite feature is the simple network traffic analysis. I already demonstrated the technique before, i.e. by subclassing QNetworkAccessManager and recording the major network activities (see my previous blog post discussing this in details). The new PhantomJS example script netsniff.js shows the use of this feature: it logs network requests and responses and dumps them in HTTP Archive (HAR) format. You can then use online HAR viewer to see the waterfall diagram, or post-process the data the way you like it. For example, here is what BBC News web site produced:

Since the entire traffic capture can be fully automated, you can have it checked against various rules. For example, you may want to ensure that KDE.org does not get significantly slower (in terms of page loading) every time someone changes the web site design. Perhaps you want to compare the resource loading with gnome.org just to confirm that it loads faster. Gathering the stats of the same site from different geographical locations might also reveal how the web page is perceived by some fans on the other side of the planet.

The use of mobile devices for consuming information is exploding. It would be fun to see PhantomJS leveraged to get the metrics behind the data traffic. I haven't bothered yet to port and test PhantomJS on Qt-based Harmattan-powered phone like the new shiny Nokia N9. Of course, if you a spare one, feel free to Fedex me :)

Thursday, June 30, 2011

quaternion multiplication: two years later

Sometime back I wrote (fun fact: it's Google first hit for faster quaternion multiplication) about my favorite commit I did exactly two years ago to Qt :

git show cbc22908
commit cbc229081a9df67a577b4bea61ad6aac52d470cb
Author: Ariya Hidayat 
Date:   Tue Jun 30 11:18:03 2009 +0200

    Faster quaternion multiplications.
    
    Use the known factorization trick to speed-up quaternion multiplication.
    Now we need only 9 floating-point multiplications, instead of 16 (but
    at the cost of extra additions and subtractions).

Ages ago, during my Ph.D research, when I worked with a certain hardware platform (hint: it's not generalized CPU), minimizing the needed number of hardware multipliers with a very little impact in the computation speed makes a huge different. With today's advanced processor architecture armed with vectorized instructions and a really smart optimizing compiler, there is often no need to use the factorized version of the multiplication.

Side note: if you want to like quaternion, see this simple rotatation quiz which can be solved quite easily once you know quaternion.

I try to apply the same trick to PhiloGL, an excellent WebGL framework from Nicolas. Recently, to my delight, he added quaternion support to the accompanying math library in PhiloGL. I think this is a nice chance to try the old trick, as I had the expectation that reducing the number of multiplications from 16 to just 9 could give some slight performance advantage.

It turns out that it is not the case, at least based on the benchmark tests running on modern browsers with very capable JavaScript engine. You can try the test yourself at jsperf.com/quaternion-multiplication. I have no idea whether this is due to JSPerf (very unlikely) or it's simply because the longer construct of the factorized version does not really speed-up anything. If any, seems that the amount of executed instruction matters more than whether addition is much faster than multiplication. And of course, we're talking about modern CPU, the difference is then becoming more subtle.

With the help of Nicolas, I tried various other tricks to help the JavaScript engine, mainly around different ways to prepare the persistent temporary variables: using normal properties, using Array, using Float32Array (at the cost of precision). Nothing leads to any significant improvement.

Of course if you have other tricks in your sleeve, I welcome you to try it with the benchmark. Meanwhile, let's hope that someday some JavaScript engine will run the factorized version faster. It's just a much cooler way to multiply quaternions!

Monday, June 27, 2011

progressive rendering via tiled backing store

Imagine you have to create a CAD-grade application, e.g. drawing the entire wireframe of a space shuttle or showing the intricacies of 9-layer printed circuit board. Basically something that involves a heavy work to display the result on the screen. On top of that, the application is still expected to perform smoothly in case the user wants to pan/scroll around and zoom in/out.

The usual known trick to achieve this is by employing a backing store, i.e. off-screen buffer that serves as the target for the drawing operations. The user interface then takes the backing store and displays it to the user. Now panning is a matter of translation and zooming is just scaling. The backing store can be updated asynchronously, thus making the user interaction decoupled from the complexity of the rendering.

Moving to a higher ninja level, the backing store can be tiled. Instead of just one giant snapshot of the rendering output, it is broken down to small tiles, say 128x128 pixels. The nice thing is because each tile can be mapped as a texture in the GPU, e.g. via glTexImage2D. Drawing each textured tile is also a (tasty) piece of cake, GL_QUAD with glBindTexture.

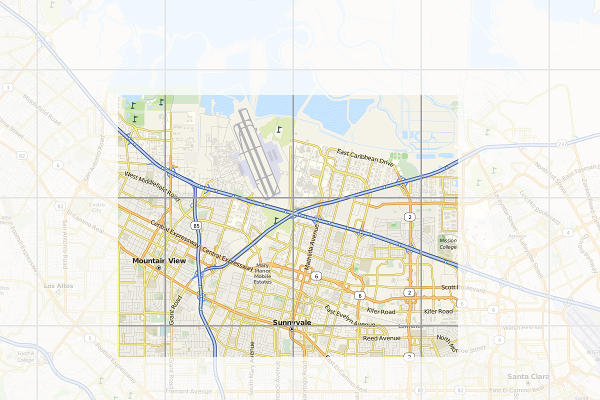
Another common use-case for tiling is for online maps. You probably use it every day without realizing it in Google Maps, OpenStreetMap, or other similar services. In this case, the reason is to use tiles is mainly to ease the network aspect. Instead of sending a huge image representing the area seen by the user in the viewport, actually lots of small images are transported and stitched together by the client code in the web browser.

Here is an illustration of the concept. The border of each tile is emphasized. The faded area is what you don't see (outside the viewport). Of course every time you pan and zoom, new fresh tiles are fetched so as to cover the viewport as much as possible.

When I started to use the first generation iPhone years ago, I realized that the browser (or rather, its WebKit implementation) uses the very similar trick. Instead of drawing the web page straight to the screen, it uses a tiled backing store. Zooming (via pinching) becomes really cheap, it's a matter of scaling up and down. Flicking is the same case, translating textures does not bother any mobile GPU that much.

Every iOS users know that if you manage to beat the browser and flick fast enough, it tries to catch up and fills the screen as fast as possible but every now and then you'll see some sort of checkerboard pattern. That is actually the placeholder for tiles which are not ready yet.

Since all the geeks out there likely better understand the technique with a piece of code, I'll not waste more paragraphs and present you this week's X2 example: full-featured implementation of tiled backing store in < 500 lines of Qt and C++. You can get the code from the usual X2 git repository, look under graphics/backingstore. When you compile and launch it, use mouse dragging to pan around and mouse wheel to zoom in/out. For the impatient, see the following 50-second screencast (or watch directly on YouTube):

For this particular trick, what you render actually does not matter much (it could be anything). To simplify the code, I do not use WebKit and instead just focus on SVG rendering, in particular of that famous Tiger head. The code should be pretty self-explanatory, especially for the TextureBuffer class, but here is some random note for your pleasure.

At the beginning, every tile is invalid (=0). Every time the program needs to draw a tile, it checks first if the tile is valid or not. If yes, it substitutes it with the checkerboard pattern instead (also called the default texture) and triggers an asynchronous update process. During the update, the program looks for the most important tile which needs to be updated (usually the one closes to the viewport center). What is a tile update? It's the actual rendering of the SVG, clipped exactly to the rectangular bounding box represented by the tile, into a texture.

To show the mix-n-match, I actually use Qt built-in software rasterizer to draw the SVG. That demonstrates that, even though each tile is essentially an OpenGL texture, you are not forced to use OpenGL to prepare the tile itself. This is essentially mixing rasterization done by the CPU with the texture management handled by the GPU.

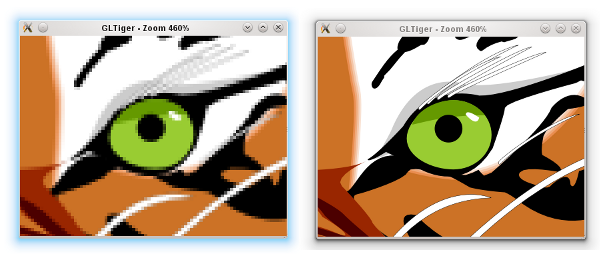
As I mentioned before, panning is a matter of adjusting the translation offset. Zooming is tricky, it involves scaling up (or down) the textures appropriately. At the same time, it also triggers an asynchronous refresh. The refresh function is nothing but to reset all the tiles to invalid again, which in turns would update each one by one. This gives the following effect (illustrated in the screenshot below). If suddenly you zoom in, you would see pixelated rendering (left). After a certain refresh delay, the tile update makes the rendering crisp again (right).

Zooming GLTiger

Because we still need to have the outdated tiles scaled up/down (those pixelated ones), we have to keep them around for a while until the refresh process is completed. This is why there is another texture buffer called the secondary background buffer. Rest assured, when none of the tiles in the background buffer is needed anymore, the buffer is flushed.

If you really want to follow the update and refresh, try to uncomment the debug compiler define. Beside showing the individual tiles better, that flag would also intentionally slows down both update and refresh so your eyes can have more time to trace them.

BTW how would you determine the tile dimension in pixels? Unfortunately this can vary from one hardware to another. Ideally it's not too small because you'd enjoy the penalty of logical overdraw. If it's too large, you might not be progressive enough. Trial and error, that can be your enlightenment process.

Being an example, this program has a lot of simplifications. First of all, usually you want the tile update to take place in a separate thread, and probably updating few tiles at once. With a proper thread affinity, this helps improving the overall perceptive smoothness. Also, in case you know upfront that it does not impact the performance that much, using texture filtering (instead of just GL_NEAREST) for the scaling would give a better zooming illusion.

You might also see that I decided not to use the tile cache approach in the texture buffer. This is again done for simplicity. The continuous pruning of unused textures ensures that we actually don't grow the textures and kill the GPU. If you really insist on the absolutely minimal amount of overdraw and texture usage, then go for a slightly complicated cache system.

Since I'm lazy, the example is using Open GL and quad drawing. If you want to run it on a mobile platform, you have patch it so that it works with Open GL ES. In all cases, converting it to use vertex and texture arrays is likely a wise initial step. While you are there, hook the touch events so you can also do the pinch-to-zoom effect.

If you are brave enough, here is another nice final finish (as suggested by Nicolas of InfoVis and PhiloGL fame). When you zoom in, the tiles in the center are prioritized. However, when you zoom out, the tiles nearby the viewport border should get the first priority, in order to fill the viewport as fast as possible.

Progressive rendering via a tiled backing store is the easiest way to take advantage of graphics processor. It's of course just one form, probably the simplest one, of hardware acceleration.

Monday, June 06, 2011

rectangular gradient

Thorsten Zachmann, from Calligra (and previously KOffice) fame, asked me once on how to draw a different kind of gradient: a rectangular one. While Qt itself has built-in supports for linear, radial, and conical gradient types, apparently for office apps we may need more than that. In short, the goal is creating the following:

It turns out that this is not so difficult at all, about 50 lines of code. Check it out at the usual X2 repository and find it under graphics/rectgradient.

Basically it boils down to a two-step process, as illustrated below. The first one is easy, just create a linear gradient from the center going north and south. The second one is similar, but now we are going east and west and clip it to two triangles. Once we combined both, we get the rectangular gradient.

Have fun with the gradient!

Thursday, April 28, 2011

tango papa echo, charlie golf kilo

journey

Currently stranded at TPE. Few minutes before leaving SFO I managed to tag 1.1.0 release for PhantomJS (lesson learned: never attempt a release few hours before boarding). Thanks to Ivan and Alessandro, few source tarballs and binaries are now ready.

It's been hectic days. 2011 WebKit Contributors Meeting was just over, it was fantastic and I got to meet and talk to a lot of WebKit rockstars. Parallel to that, my fellow brave Sencha lads finally unleashed The Quattro!

Next stop, also the final destination: CGK. Bracing for the impact of reverse culture shock...

Friday, March 11, 2011

PhantomJS meets CoffeeScript

I did something related to CoffeeScript before, namely simple command-line compiler. For those who are not aware of CoffeeScript, it's basically (from Wikipedia) JavaScript with "syntactic sugar inspired by Ruby and Python".

On the hand, surprisingly PhantomJS generates more interest than I ever imagined before (with over 240 watching its repository), prompting me not to abandon it too soon :) In fact, I decided to dump my tought on its roadmap since more and more people are willing to help.

My secret feature, which is not secret anymore, for the upcoming 1.1 release is to incorporate the CoffeeScript compiler so that PhantomJS scripts can be written in CoffeeScript. Since the intention of PhantomJS is for various scripting purpose utilizing headless QtWebKit, this is a perfect match.

Gone are the curly braces...

Tuesday, February 22, 2011

vim: fast file navigation with Command-T

Judging from the hits, my blog post on lightning-fast project navigation in vim seems to be still popular. While the Project script is still my favorite these days, especially when dealing with hundreds of files, let me show you here another gem: Command-T script.

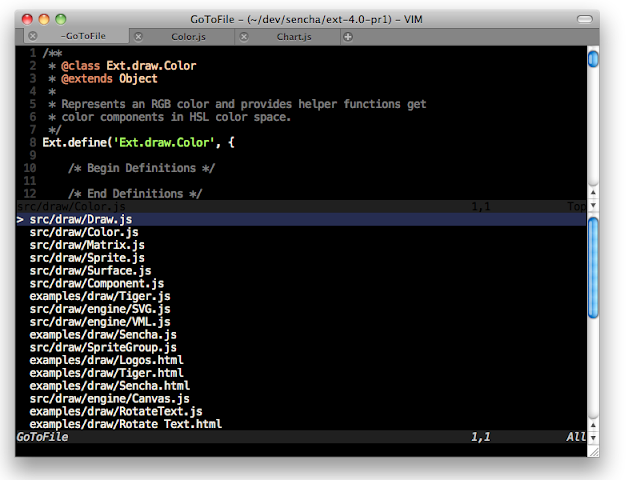
Similar to Command-T in TextMate, basically this Command-T script allows quick and incremental search for files. This works very well. The official site for Command-T has several good screencasts which demonstrate how to install and set it up.

Manual installation is fairly simple. In fact, if you use Janus (which what I strongly do recommend these days for vim lovers), you are already set.

Command-T's documentation is quite extensive, make sure you read it. For the impatient, here are three important tidbits.

(1) Command-T requires vim with Ruby support. One way to find this is:

vim --version | grep '\+ruby'

(2) The default binding is Leader-t. For MacVim (or other GUI-based vim on Mac) and you'd like to have it on your Command-t (or D-T, in vim's terminology), just insert the following in your .vimrc:

  if has("gui_macvim")
    macmenu &File.New\ Tab key=
    map  :CommandT
  endif

(3) If you like to open the selected file in a new tab, hit Ctrl+T instead of just Enter.

One side note: if you have MacVim but don't have the mvim shortcut, add this to your .profile (or .bash_profile):

alias mvim='/Applications/MacVim.app/Contents/MacOS/Vim -g'

This way, you can launch MacVim from terminal, e.g. mvim code.js.

And in case you still want to use TextMate, why don't you check out TextMate2 instead?

Monday, February 21, 2011

color wheel on Canvas

While I played with HSV pie and color wheel before, usually I just use the excellent Qt graphics stack to try out various things. This days, I lean towards using web technologies and for that purpose, HTML Canvas suits me just fine. With PhantomJS, I even got the result rendered as PNG image.

The new example I added to PhantomJS is colorwheel.js which produces the above screenshot. The entire script code is as follows (if some parts look cryptic, read about HSL and HSV color space):

if (phantom.state.length === 0) {
    phantom.state = 1;
    phantom.viewportSize = { width: 400, height : 400 };
    phantom.content = '<html><body><canvas id="surface">' +
        '</canvas></body></html>';
} else {
    var el = document.getElementById('surface'),
        context = el.getContext('2d'),
        width = window.innerWidth,
        height = window.innerHeight,
        cx = width / 2,
        cy = height / 2,
        radius = width  / 2.3,
        imageData,
        pixels,
        hue, sat, value,
        i = 0, x, y, rx, ry, d,
        f, g, p, u, v, w, rgb;

    el.width = width;
    el.height = height;
    imageData = context.createImageData(width, height);
    pixels = imageData.data;

    for (y = 0; y < height; y = y + 1) {
        for (x = 0; x < width; x = x + 1, i = i + 4) {
            rx = x - cx;
            ry = y - cy;
            d = rx * rx + ry * ry;
            if (d < radius * radius) {
                hue = 6 * (Math.atan2(ry, rx) + Math.PI) / (2 * Math.PI);
                sat = Math.sqrt(d) / radius;
                g = Math.floor(hue);
                f = hue - g;
                u = 255 * (1 - sat);
                v = 255 * (1 - sat * f);
                w = 255 * (1 - sat * (1 - f));
                pixels[i] = [255, v, u, u, w, 255, 255][g];
                pixels[i + 1] = [w, 255, 255, v, u, u, w][g];
                pixels[i + 2] = [u, u, w, 255, 255, v, u][g];
                pixels[i + 3] = 255;
            }
        }
    }

    context.putImageData(imageData, 0, 0);
    document.body.style.backgroundColor = 'white';
    document.body.style.margin = '0px';

    phantom.render('colorwheel.png');
    phantom.exit();
}

Beside the above example, there are few other things which you'll get in the upcoming PhantomJS 1.1 release, among others support for Unix shebang, file upload for form submission, disable/enable images loading and plugins, as well as support for QUnit integration.

Sunday, January 23, 2011

PhantomJS: minimalistic headless WebKit-based JavaScript-driven tool

PhantomJS is a headless WebKit packaged as a JavaScript-driven tool. It can be used in command-line utilities which requires web stack, or even as the basis for testing rich web application. It uses WebKit in a headless mode, so you get access to the real native and fast implementation (not a simulated environment) of various standards such as DOM, CSS selector, Canvas, SVG, and many others.

The project page contains a bunch of examples, from easy ones to some more complicated uses. Feel free to contribute more examples!

Let's look at one of the examples, the page rasterizer (yes, it's only 16 lines!):

if (phantom.state.length === 0) {
    if (phantom.args.length !== 2) {
        console.log('Usage: rasterize.js URL filename');
        phantom.exit();
    } else {
        var address = phantom.args[0];
        phantom.state = 'rasterize';
        phantom.viewportSize = { width: 600, height: 600 };
        phantom.open(address);
    }
} else {
    var output = phantom.args[1];
    phantom.sleep(200);
    phantom.render(output);
    phantom.exit();
}

If I want to have the famous PostScript tiger from its SVG source, all I have to do is to run:

phantomjs rasterize.js http://ariya.github.com/svg/tiger.svg tiger.png

But static vector graphic is boring. Replacing the above with

phantomjs rasterize.js http://raphaeljs.com/polar-clock.html clock.png

gives me Polar Clock, one notable example from RaphaelJS.

Should you need to deal with JSONP, process XML, and integrate with YQL, that's all easily done. Again, refer to the various service integration examples. Let me show one example, which is actually my favorite:

if (phantom.state.length === 0) {
    var origin, dest;
    if (phantom.args.length < 2) {
        console.log('Usage: direction.js origin destination');
        console.log('Example: direction.js "San Diego" "Palo Alto"');
        phantom.exit(1);
    }
    origin = phantom.args[0];
    dest = phantom.args[1];
    phantom.state = origin + ' to ' + dest;
    phantom.open(encodeURI('http://maps.googleapis.com/maps/api/directions/xml?origin='
        + origin +  '&destination=' + dest + 
        '&units=imperial&mode=driving&sensor=false'));
} else {
    if (phantom.loadStatus === 'fail') {
        console.log('Unable to access network');
    } else {
        var steps;
        steps = phantom.content.match(/<html_instructions>(.*)<\/html_instructions>/ig);
        if (steps == null) {
            console.log('No data available for ' + phantom.state);
        } else {
            steps.forEach(function (ins) {
                ins = ins.replace(/\&lt;/ig, '<').replace(/\&gt;/ig, '>');
                ins = ins.replace(/\<div/ig, '\n<div');
                ins = ins.replace(/<.*?>/g, '');
                console.log(ins);
            });
        }
    }
    phantom.exit();
}

If I run it like the following:

phantomjs direction.js 'Redwood City' 'Sunnyvale'

what I got is the complete driving direction:

Head east on Broadway toward El Camino Real
Take the 1st left onto El Camino Real
Turn right at Whipple Ave
Slight right to merge onto US-101 S toward San Jose
Take exit 398B to merge onto CA-85 S toward Santa Cruz/Cupertino
Take exit 22A to merge onto CA-82 S/E El Camino Real toward Sunnyvale
Destination will be on the right

Map data ©2011 Google

Make sure you check out other examples, such as getting weather forecast conditions, finding pizza in New York, looking up approximate location based on IP address, pulling the list of seasonal food, displaying tweets, and many others.

Headless execution of any web content also enables fast unit testing. Obviously, the goal is not to replace comprehensive, cross-browser framework such as Selenium or Squish for Web. Rather, it serves a quick sanity check just before you check in some changes.

Since this can happen automatically and does not need to launch any browser, even better, you can hook the test so that it executes right before a commit and actually prevents the commit if any of the test fails. It is easily done using git via its hook support. This is something I have written at Sencha blog. It demonstrated precommit hook with Jasmine, but technically it can work with any test framework.

I have been working on and off on PhantomJS for the past few years. You may be already familiar with some of its inspiration (also involving headless WebKit): SVG rasterizer, page capture, visual Google, etc. Finally I managed to overcome my laziness, cleaned up the code, and published it for your pleasure. Obviously it's not a surprise if you find out that PhantomJS uses QtWebKit.

I got a few tasks for next PhantomJS version 1.1. You are encouraged to file bugs and feature requests in the said issue tracker.

Get it while it is hot!

Saturday, January 08, 2011

command line CoffeeScript

CoffeeScript seems to be picking up some momentum these days. No doubt, it is very valuable to help writing cleaner code.

The command-line choices to run CoffeeScript compiler right now are either using Rhino (jcoffeescript) or using NodeJS. While I love NodeJS, seems that it is an overkill to require the entire NodeJS stack/infrastructure/package manager to invoke CoffeeScript compiler.

The solution is to use V8, the powerful JavaScript engine, with a little binding so that it can access file system. This is exactly filejs, something I have shown before, e.g. to invoke JSLint from command line.

Combining filejs and CoffeeScript is terribly easy. Just follow these steps.

Note: filejs does not support Windows yet. Sorry.

First of all, if you have not done it, build filejs. Go to the X2 repository, it is under the javascript/filejs folder. Open the included README.TXT and follow the instructions on how to build V8 and filejs.

After you build it, copy both filejs executable and coffee.js to somewhere in your PATH. Usually I stash that kind of stuff in ~/bin and ensure that ~/bin is in my PATH.

Now get coffee-script.js (the CoffeeScript to JavaScript compiler) and store it somewhere, e.g. ~/bin again.

Create a new file called coffee, which has the following one-line content:

filejs ~/bin/coffee.js $1

Make that file executable and then save it to ~/bin (again).

Open coffee.js and modify the value of the compiler variable to point to your coffee-script.js. Note: this must use the absolute path name.

Now you can do the following:

coffee hello.coffee

If hello.coffee is your script written in CoffeeScript, the converted JavaScript version will be dumped to the standard output.

Feel free to tweak coffee.js so that it understands and passes various CoffeeScript compiler options!

Fun, isn't it?

Saturday, January 01, 2011

X2 from Ofi Labs: wrap-up 2010

X2It got started when I needed a new home for my examples. It has even a nice logo.

sensor

accelerometer viewer for Maemo 5 (Nokia N900).

bouncing ball, where the gravity affects the movement of the ball.

box of marbles, where the gravity affects a bunch of colored marbles.

combining accelerometer and network to do inter-device marbles transfer.

motion and orientation for web applications.

web-based version of marble box.

widgets

morphing clock, where the transition between the digital and analog version is a kind of morphing effect.

qpalette viewer so you know which color is which one.

graphics

fast approximation of Gaussian blur to create a blurry drop shadow.

command-line capture tool to save maps from OpenStreetMap, MapQuest and Ovi Maps.

simple tool to list all chunks inside a PNG image.

webkit & javascript

file processing, including using jslint, in command-line using JavaScript.

play Canvas-based game as normal desktop app.

offline, command line beautifier for JavaScript code, utilizing Qt Script.

another variant of the beautifier, this time using V8.

minimalistic editing widget for JavaScript code, with custom syntax highlighting.

white background is boring? just try some color inverted web pages.

detect the closest link to ease following it on a touch device.

Canvas pixel manipulation for plasma effect.

network

simple proxy server for HTTP, in 100 lines.

tracenet: trap all network requests+replies to show them with Speed Tracer.

filterproxy: another variant of the proxy server with added URL filtering feature.

Thursday, December 16, 2010

motion vs orientation

I already showed the use of device orientation in a fun game called Box of Marbles. Based on my experience trying out this API implementation, often it is easy to get confused by device motion vs device orientation. Thus, I created two web-based applications (using on Sencha Touch): Device Motion and Device Orientation. Each basically just visualizes the values of the data in a bunch of sliders:

You can find the code in the usual X2 repository, under the subdirectory javascript/devicemotion and javascript/deviceorientation, respectively. Obviously, the rest of Sencha Touch library is needed before you can deploy and run the examples. For the lazy, just run the live demo for Device Motion and Device Orientation (they support offline mode).

While right now only iOS 4.2 on iPhone/iPad/iPod Touch implements this API, I have a strong hope that Android (post Gingerbread) and Nokia (thanks to QtWebKit and Qt Mobility) will support this cool API in the near future. Well, at least I do plan to revive my Symbian setup to custom compile QtWebKit and test it on Nokia N8.

Side note: from my limited understanding, seems that both accelerometer and gyroscope are needed in order to supply the accurate data, much like in an inertial navigation system ("Inertial Phone", anyone?).

Wednesday, November 10, 2010

V8 + jslint + vim

Usually, you would want to use scripting solution, e.g. Perl/Python/whatever, to manipulate file contents. Somehow, it's also fun to use JavaScript instead. After I did the V8-based jsbeautify, I was doing V8-based jslint as well. Then I realized, let's just extend it to be generic. With API loosely modelled after CommonJS, filejs was born. Find it in the usual X2 repository under the javascript/filejs. There are two examples so far, ROT-13 and line counter. If you write more examples, feel free to pass them to me!

Of course, the twist is: use filejs to drive a command-line jslint. This is one way to do it. First build filejs (follow the instructions in the included README), then place the executable in your PATH. Create a simple shell script, which contains one line filejs /path/to/filejs/jslint.js $1 and make it executable. That's it! If you also store this shell script in your PATH, then you just need to run:

jslint source-code.js

If you use vim, jslint can be combined with Quickfix. First of all, associate *.js with the tool by putting this line in your personal .vimrc:

au FileType javascript set makeprg=jslint\ %

Now open a JavaScript file and run :make (or whatever shortcut you map this into), which will launch jslint with the current file. After a while, use :cope to open the quickfix little window, move up and down, and press Enter to bring you back to the main editor and set the cursor at the specified problem. Use standard window navigation, e.g. Ctrl+W W to switch to quickfix pane again. Check the quickfix documentation for details. All in all, you may want to map mostly used commands to some shortcuts for faster access.

Note that since this is dynamic JavaScript, rather than matching errorformat, technically I just tweaked the tool to spit something similar to what a C/C++ compiler would do. Also, if you need different jslint options, simply edit the invocation to suit your needs.

It's been a while since I blogged about vim. The last one was about the project plugin, which is surprisingly still quite popular. Hopefully this one also teaches you a trick or two, especially if you work a lot with JavaScript code.

Note 1: It does not work on Windows yet. No idea if I would have the time to do it, patch is welcomed.

Note 2: This is not a replacement for NodeJS, nor would it grow to include more functions.

Note 3: For the sake of completeness, let me mention that there are already other countless solutions for command-line jslint (using Rhino, SpiderMonkey, JSC, etc), even with vim integration.

Tuesday, November 09, 2010

chunks inside PNG

Here is a few minutes of hack which would hopefully help someone else:

pngchunks logo.png
File size: 5967 byte(s)

Offset    Chunk    Size
      8    IHDR      13
     33    iCCP    2627
   2672    IDAT    3271
   5955    IEND       0

Useful to quickly find out if we can further strip unnecessary chunks from the PNG image. Or even as a warming up before you fire your favorite hex viewer/editor.

It's pure, stand-alone, self-contained C code (i.e. compile using gcc -o pngchunks pngchunks.c), available at the usual X2 repository, find it under graphics/pngchunks.

Thursday, October 28, 2010

morphing clock revisited

If you can't see the clock below, visit the stand alone demo.

Technically, I had wanted to wait till it can display the actual time and perhaps ask some designer to polish it. But rather than keeping this lunch-break hack in a safe deposit box forever, let me just release this ugly clock transition (since everyone is on the animation frenzy). So far it works only if you use latest version of Safari, Chrome, Opera, Firefox. Canvas and/or VML fallback (which sadly will require JavaScript) for other browser are in the pipeline.

Basically it is another version of my previous morphing clock attempt (see the video). The principle is the same, except now I modified that C++ program to also output an HTML which renders the clock as above.

Also it morphs only once. Reload the page to enjoy the morphing once more. Maybe I'll find the time (in another lunch break) to toggle the two clock modes. Update: morphing from/to both analog and digital mode is implemented.

Like I said, it's a creepy, machine-generated, ugly looking clock. You've been warned, but feel free to write me anything (should you need to vent your anger).

Thursday, October 14, 2010

sencha touch hackathon

Are you in the Bay Area? Don't miss our Sencha Touch Hackathon this Saturday (Oct 16) in our Palo Alto Office, 1pm to 5pm. There will be food and drinks as well.

Drop by and upgrade your Sencha Touch kungfu!

yet another command-line JavaScript beautifier (based on V8)

While we're still on the topic of JavaScript, I took the afternoon break to create a command-line runner for jsbeautifier.org . In case you miss it, I did the similar thing using Qt Script module. This time however, the command-line tool uses and exploits Google V8 instead.

If you update your clone of js-beautify repository, check out the fresh v8 subdirectory. I also mirror the code in the usual X2 repository, under the javascript/jsbeautify8 subdirectory. Also, grok the included README.txt first.

Update: I added --overwrite option which (surprise!) will overwrite the original source file (and thus, use it with care). This is useful if you invoke the beautifier tool from your text editor. Nicolas also implemented various settings support so you can specify the indentation level, braces placement, etc.

This is probably the last thing the world needs now, but hey, it was a fun break.

Friday, September 24, 2010

invade & destroy

Developing games using HTML5 Canvas and JavaScript is simply the future. Something classic like Egor Balishev's RGB Invader, an entry in the 10K Apart, is usually my favorite.

If for some reasons (which I would not elaborate in this post) you need to deploy the game as a desktop or a mobile application, using Canvas and JavaScript gives another advantage: just package it with WebKit, for example QtWebKit if you do not mind using Qt.

However, since usually it is just about Canvas, often it is enough to run the game logic with a JavaScript interpreter and use some Canvas implementation for the display. This was something that I demonstrated before, i.e. running the Monster Evolution demo via JavaScriptCore and V8. Applying the same technique, and adjusting the shim so that it layers whatever RGB Invader requires, gives the following:

Basically it is using Qt Script (also in attempt to popularize it even more) along with a mix of C++/QObject and JavaScript machinery to fool the game code to think it's running in a browser environment. It was a nice afternoon fun project.

The code is in the X2 repository, find it under the javascript/invader directory. Get it while it's hot, and save our Earth!

Monday, September 20, 2010

offline, command-line beautifier for JavaScript code

There are many different ways to autoformat JavaScript code, my favorite is always jsbeautifier.org. Apparently, you can also use it locally without a web browser since it supports running it with Rhino.

It took me just few minutes to reimplement the same functionality, but using Qt Script, the fantastic ECMAScript support built into Qt.

The code is in the usual X2 repository, under the javascript/jsbeautify. Note that this is just a convenient mirror as Einar's js-beautify repository already includes this Qt Script driver.

With the rise of server-side JavaScript and desktop-esque JavaScript tools, I hope Qt Script will become more popular. It is sadly still "underrated" right now.