My blog has been moved to ariya.ofilabs.com.
Showing posts with label graphics. Show all posts

Wednesday, July 06, 2011

fluid animation with accelerated composition

Those who work on web-based applications on mobile platforms often recall the advice, "Use translate3d to make sure it's hardware accelerated". This advice seems magical at first, and I seldom find anyone who explains (or wants to explain) the actual machinery behind such a practical tip.

For a while, Safari (and Mobile Safari) was the only WebKit-based browser which supports hardware-accelerated CSS animation. Google Chrome caught up, QtWebKit-powered browser (like the one in Nokia N9) also finally supported it. Such a situation often gave the wrong impression that Apple kept the hardware-acceleration code for themselves.

The above two are basically the reasons for this blog post.

In case you miss it (before we dive in further), please read what I wrote before about different WebKit ports (to get the idea of implementation + back-end approach) and tiled backing store (decoupling web page complexity with smooth UX). The GraphicsContext abstraction will be specially useful in this topic. In particular, because animation is tightly related to efficient graphics.

Imagine if you have to move an image (of a unicorn, for example) from one position to another. The pseudo-code for doing it would be:

  for pos = startPosition to endPosition
    draw unicorn at pos

To ensure smooth 60fps, your inner loop has only 16 ms to draw that unicorn image. Usually this is a piece of cake because all the CPU does is sending the pixels of the unicorn image once to the GPU (in the form of texture) and then just refer the texture inside the animation loop. No heavy work is needed on the CPU and GPU sides.

If, however, what you draw is very complicated, e.g. formatted text consisting of different font typefaces and sizes, this gets hairy. The "draw" part can take more than 16 ms and the animation is not butter-smooth anymore. Because your text does not really change during the animation, only the position changes, the usual trick is to cache the text, i.e. draw it onto a buffer and just move around the buffer as needed. Again, the CPU just needs to push the buffer the GPU once:

    prepare a temporary buffer
    draw the text onto the buffer
    for pos = startPosition and endPosition
       set a new transformation matrix for the buffer

As you can imagine, that's exactly what happens when WebKit performs CSS animation. Instead of drawing your div (or whatever you animate) multiple times in different position, it prepares a layer and redirect the drawing there. After that, animation is a simple matter of manipulating the layer, e.g. moving it around. WebKit term for this (useful if you comb the source code) is accelerated composition accelerated compositing.

Side note: Mozilla has the same concept, available since Firefox 4, called Layer.

If you understand immediate vs retain mode rendering, non-composited vs composited is just like that. The idea to treat the render tree more like a scene graph, a stack of layers with different depth value.

Because composition reduces the computation burden (GPU can handle varying transformation matrix efficiently), the animation is smoother. This is not so noticeable if you have a modern machine. In the following video demo (http://youtu.be/KujWTTRkPkM), I have to use my slightly old Windows laptop to demonstrate the frames/second differences:

The excellent falling leaves animation is something you have seen before, back when WebKit support for CSS animation was announced.

Accelerated composition does not magically turn every WebKit ports capable of doing fluid animation. Analog to my previous rounded corner example, composition requires the support from the underlying platform. On Mac OS X port of WebKit, composition is mapped into CoreAnimation (part of CoreGraphics), the official API to have animated user interface. Same goes for iOS WebKit. On Chromium, it is hooked into sandboxed GPU process.

With QtWebKit, composition is achieved via Graphics View framework (read Noam's explanation for details). The previous video you have seen was created with QtWebKit, running without and with composition, i.e. QGraphicsWebView with different AcceleratedCompositingEnabled run-time setting. If you want to check out the code and try it yourself, head to the usual X2 repository and look under webkit/composition. Use spacebar (or mouse click) to switch between composited and non-composited mode. If there is no significant frame rate improvement, increase NUMBER_OF_LEAVES in leaves.js and rebuild. When compositing is active, press D to draw thin yellow border around each layer. Since it's all about Graphics View, this debugging is easy to implement. I just inject a custom BorderEffect, based on QGraphicsEffect (which I did prototype back when I was with Nokia):

Thus, there is nothing like hidden secret with respect to Safari hardware-accelerated CSS support. In fact, Safari is not different than other Mac apps. If you compile WebKit yourself and build an application with it, you would definitely get the animation with hardware acceleration support.

As the bonus, since Mac and iOS WebKit delegate the animation to CoreAnimation (CA), you can use various CA tweaks to debug it. CA_COLOR_OPAQUE=1 will emphasize each layer with red color overlay (as in the demo). While this applies to any CA-based apps (not limited to WebKit or Safari), it's still very useful nevertheless. Chromium's similar feature is --show-composited-layer-border command line option.

How does WebKit determine what to composited? Since the goal is to fully take advantage of the GPU, there are few particular operations which are suitable for such a composition. Among others are transparency (opacity < 1.0) and transformation matrix. Ideally we would just use composition for the entire web page. However, composition implies a higher memory allocation and a quite capable graphics processor. On mobile platforms, these two translate into additional critical factor: power consumption. Thus, one just needs to draw a line somewhere and stick with it. Hence, that's why currently (on iOS) translate3d and scale3d are using composition and their 2-D counterparts are not. Addendum: on the desktop WebKit, all transformed element is accelerated, regardless whether it's 2-D or 3-D.

If you make it this far, here are few final twists.

First of all, just like the tiled backing store approach I explained before, accelerated composition does not force you to use the graphics processor for everything. For efficiency, your layer (backing store) might be mapped to GPU textures. However, you are not obligated to prepare the layer, i.e. drawing onto it, using the GPU. As an example, you can use a software rasterizer to draw to a buffer which will be mapped to OpenGL texture.

In fact, a further variation of this would be not to use the GPU at all. This may come as a surprise to you but Android 2.2 (Froyo) added composition support (see the commit), albeit doing everything with in software (via its Skia graphics engine). The advantage is of course not that great (compared to using OpenGL ES entirely), however the improvement is really obvious. If you have two Android phones (of the same hardware specification), one still running the outdated 2.1 (Eclair) and the other with Froyo, just open the Falling Leaves demo and watch the frame rate difference.

With the non-GPU composition-based CSS animation in Froyo, translate3d and other similar tricks do not speed-up anything significantly. In fact, it may haunt you with bugs. For example, placing form elements in a div could wreck the touch events accuracy, mainly because the hit test procedures forget to take into account that the composited layer has moved. Things which seem to work just fine Eclair may start behaving weird under Froyo and Gingerbread. If that happens to you, check your CSS properties.

Fortunately (or unfortunately, depending on your point of view), Android madness with accelerated composition is getting better with Honeycomb and further upcoming releases. Meanwhile, just take it for granted that your magical translate3d spell has no effect on the green robots.

Last but not least, I'm pretty excited with the lightweight scene graph direction in the upcoming Qt 5. If any, this will become a better match for QtWebKit accelerated composition compared to the current Graphics View solution. This would totally destroy the myth (or misconception) that only native apps can take advantage of OpenGL (ES). Thus, if you decide to use web technologies via QtWebKit (possibly through the hybrid approach), your investment would be future-attractive!

Monday, June 27, 2011

progressive rendering via tiled backing store

Imagine you have to create a CAD-grade application, e.g. drawing the entire wireframe of a space shuttle or showing the intricacies of 9-layer printed circuit board. Basically something that involves a heavy work to display the result on the screen. On top of that, the application is still expected to perform smoothly in case the user wants to pan/scroll around and zoom in/out.

The usual known trick to achieve this is by employing a backing store, i.e. off-screen buffer that serves as the target for the drawing operations. The user interface then takes the backing store and displays it to the user. Now panning is a matter of translation and zooming is just scaling. The backing store can be updated asynchronously, thus making the user interaction decoupled from the complexity of the rendering.

Moving to a higher ninja level, the backing store can be tiled. Instead of just one giant snapshot of the rendering output, it is broken down to small tiles, say 128x128 pixels. The nice thing is because each tile can be mapped as a texture in the GPU, e.g. via glTexImage2D. Drawing each textured tile is also a (tasty) piece of cake, GL_QUAD with glBindTexture.

Another common use-case for tiling is for online maps. You probably use it every day without realizing it in Google Maps, OpenStreetMap, or other similar services. In this case, the reason is to use tiles is mainly to ease the network aspect. Instead of sending a huge image representing the area seen by the user in the viewport, actually lots of small images are transported and stitched together by the client code in the web browser.

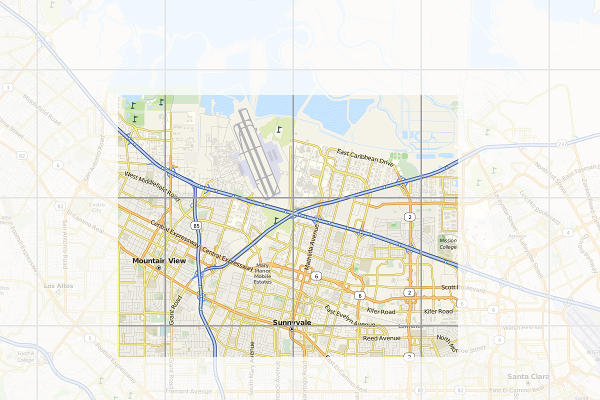
Here is an illustration of the concept. The border of each tile is emphasized. The faded area is what you don't see (outside the viewport). Of course every time you pan and zoom, new fresh tiles are fetched so as to cover the viewport as much as possible.

When I started to use the first generation iPhone years ago, I realized that the browser (or rather, its WebKit implementation) uses the very similar trick. Instead of drawing the web page straight to the screen, it uses a tiled backing store. Zooming (via pinching) becomes really cheap, it's a matter of scaling up and down. Flicking is the same case, translating textures does not bother any mobile GPU that much.

Every iOS users know that if you manage to beat the browser and flick fast enough, it tries to catch up and fills the screen as fast as possible but every now and then you'll see some sort of checkerboard pattern. That is actually the placeholder for tiles which are not ready yet.

Since all the geeks out there likely better understand the technique with a piece of code, I'll not waste more paragraphs and present you this week's X2 example: full-featured implementation of tiled backing store in < 500 lines of Qt and C++. You can get the code from the usual X2 git repository, look under graphics/backingstore. When you compile and launch it, use mouse dragging to pan around and mouse wheel to zoom in/out. For the impatient, see the following 50-second screencast (or watch directly on YouTube):

For this particular trick, what you render actually does not matter much (it could be anything). To simplify the code, I do not use WebKit and instead just focus on SVG rendering, in particular of that famous Tiger head. The code should be pretty self-explanatory, especially for the TextureBuffer class, but here is some random note for your pleasure.

At the beginning, every tile is invalid (=0). Every time the program needs to draw a tile, it checks first if the tile is valid or not. If yes, it substitutes it with the checkerboard pattern instead (also called the default texture) and triggers an asynchronous update process. During the update, the program looks for the most important tile which needs to be updated (usually the one closes to the viewport center). What is a tile update? It's the actual rendering of the SVG, clipped exactly to the rectangular bounding box represented by the tile, into a texture.

To show the mix-n-match, I actually use Qt built-in software rasterizer to draw the SVG. That demonstrates that, even though each tile is essentially an OpenGL texture, you are not forced to use OpenGL to prepare the tile itself. This is essentially mixing rasterization done by the CPU with the texture management handled by the GPU.

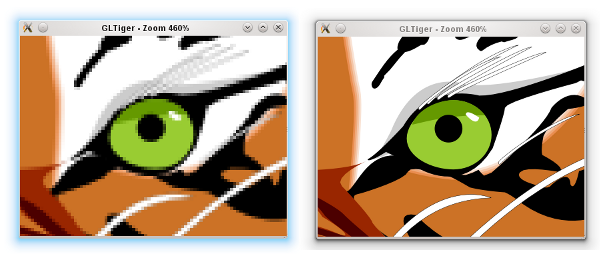
As I mentioned before, panning is a matter of adjusting the translation offset. Zooming is tricky, it involves scaling up (or down) the textures appropriately. At the same time, it also triggers an asynchronous refresh. The refresh function is nothing but to reset all the tiles to invalid again, which in turns would update each one by one. This gives the following effect (illustrated in the screenshot below). If suddenly you zoom in, you would see pixelated rendering (left). After a certain refresh delay, the tile update makes the rendering crisp again (right).

Zooming GLTiger

Because we still need to have the outdated tiles scaled up/down (those pixelated ones), we have to keep them around for a while until the refresh process is completed. This is why there is another texture buffer called the secondary background buffer. Rest assured, when none of the tiles in the background buffer is needed anymore, the buffer is flushed.

If you really want to follow the update and refresh, try to uncomment the debug compiler define. Beside showing the individual tiles better, that flag would also intentionally slows down both update and refresh so your eyes can have more time to trace them.

BTW how would you determine the tile dimension in pixels? Unfortunately this can vary from one hardware to another. Ideally it's not too small because you'd enjoy the penalty of logical overdraw. If it's too large, you might not be progressive enough. Trial and error, that can be your enlightenment process.

Being an example, this program has a lot of simplifications. First of all, usually you want the tile update to take place in a separate thread, and probably updating few tiles at once. With a proper thread affinity, this helps improving the overall perceptive smoothness. Also, in case you know upfront that it does not impact the performance that much, using texture filtering (instead of just GL_NEAREST) for the scaling would give a better zooming illusion.

You might also see that I decided not to use the tile cache approach in the texture buffer. This is again done for simplicity. The continuous pruning of unused textures ensures that we actually don't grow the textures and kill the GPU. If you really insist on the absolutely minimal amount of overdraw and texture usage, then go for a slightly complicated cache system.

Since I'm lazy, the example is using Open GL and quad drawing. If you want to run it on a mobile platform, you have patch it so that it works with Open GL ES. In all cases, converting it to use vertex and texture arrays is likely a wise initial step. While you are there, hook the touch events so you can also do the pinch-to-zoom effect.

If you are brave enough, here is another nice final finish (as suggested by Nicolas of InfoVis and PhiloGL fame). When you zoom in, the tiles in the center are prioritized. However, when you zoom out, the tiles nearby the viewport border should get the first priority, in order to fill the viewport as fast as possible.

Progressive rendering via a tiled backing store is the easiest way to take advantage of graphics processor. It's of course just one form, probably the simplest one, of hardware acceleration.

Friday, June 10, 2011

your webkit port is special (just like every other port)

One of the most often question I got, "Since browser Foo and browser Bar are using the same WebKit engine, why do I get different feature set?".

Let's step aside a bit. Boeing 747, a very popular airliner, uses Pratt & Whitney JT9D engine. So does Airbus A310. Do you expect both planes to have the same flight characteristics? Surely not, there are other bazillion factors which decide how that big piece of metal actually flies. In fact, you would not expect A310-certified pilot to just jump into 747 cockpit and land it.

(Aviation fans, please forgive me if the above analogy is an oversimplification).

WebKit, as a web rendering engine, is designed to use a lot of (semi)abstract interfaces. These interfaces obviously require (surprise) some implementation. Example of such interfaces are network stack, mouse + key handling, thread system, disk access, memory management, graphics pipeline, etc.

What is the popular reference to WebKit is usually Apple's own flavor of WebKit which runs on Mac OS X (the first and the original WebKit library). As you can guess, the various interfaces are implemented using different native libraries on Mac OS X, mostly centered around CoreFoundation. For example, if you specify a flat colored button with specific border radius, well WebKit knows where and how to draw that button. However, the final actual responsibility of drawing the button (as pixels on the user's monitor) falls into CoreGraphics.

With time, WebKit was "ported" into different platform, both desktop and mobile. Such flavor is often called "WebKit port". For Safari Windows, Apple themselves also ported WebKit to run on Windows, using the Windows version of its (limited implementation of) CoreFoundation library.

Beside that, there were many other "ports" as well (see the full list). Via its Chrome browser (and the Chromium sister project), Google has created and continues to maintain its Chromium port. There is also WebKitGtk which is based on Gtk+. Nokia (through Trolltech, which it acquired) maintains the Qt port of WebKit, popular as its QtWebKit module.

(This explains why any beginner scream like "Help! I can't build WebKit on platform FooBar" would likely get an instant reply "Which port are you trying to build?").

Consider QtWebKit, it's even possible (through customized QNetworkAccessManager, thanks to Qt network modularity) to hook a different network backend. This is for example what is being done for KDEWebKit module so that it becomes the Qt port of WebKit which actually uses KDE libraries to access the network.

If we come back to the rounded button example, again the real drawing is carried out in the actual graphics library used by the said WebKit port. Here is a simplified diagram that shows the mapping:

GraphicsContext is the interface. All other code inside WebKit will not "speak" directly to e.g. CoreGraphics on Mac. In the above rounded button example, it will call GraphicsContext's fillRoundedRect() function.

There are various implementation of GraphicsContext, depending on the port. For Qt, you can see how it is done in GraphicsContextQt.cpp file.

Should you know a little bit about graphics, you would realize that there are different methods and algorithms to rasterize a filled rounded rectangle. A certain approach is to convert it to a fill polygon, another one is to scanline-convert the rounded corner directly. A fully GPU-based system may prefer working with tessellated triangle strips, or even with shader. Even the antialiasing level defines the outcome, too.

In short, different graphic stacks with different algorithm may not produce the same result down to the exact pixel colors. It all depends various factors, including the complexity of the drawing itself.

Now the same concept applies to other interfaces. For example, there is no HTTP stack inside WebKit code base. All network-aware code calls specific function to get resources off the server, post some data, etc. However, the actual implementation is in system libraries. Thus, don't bother trying to find SSL code inside WebKit.

This gets us to this question, "If browser X is using WebKit, why it does not have feature Z?". You may be able to deduce the reason. Imagine a certain graphic stack which glues GraphicsContext for that platform does not implement fillRoundedRect() function, what would happen? Yes, your rounded button suddenly becomes a square button.

As a matter of fact, when someone ports WebKit to a new platform, she will need to implement all these interfaces one by one. Until it is complete, of course not everything would work 100% and most likely only the basics are there. That should feel like putting a jet engine into an airframe that can't fly yet.

"Can we have one de-facto graphics stack that powers WebKit so we always have pixel-perfect rendering expectation?" Technically yes, but practically no. In fact, while Boeing and Airbus may buy the same engine from Pratt & Whitney, they may not want to have the exact same landing gears. Everyone of us wants to be special. A certain system wants to use OpenGL ES, squeeze the best performance out of it and doesn't really care if the selling price goes up. Others want to sacrifice the speed, trim the silicon floor and make the device more affordable. More often, you just have to live with diversity.

And if you want to put aside all the differences, two WebKit ports of the same revision share tons of stuff, especially if they use the same JavaScript engine. They will parse HTML and CSS in the same way, produce the same DOM, yield the same render tree, have the same JavaScript host objects, and so on.

Thus, next time someone shouts "there is no two exact WebKit", you know the story behind it.

Monday, June 06, 2011

rectangular gradient

Thorsten Zachmann, from Calligra (and previously KOffice) fame, asked me once on how to draw a different kind of gradient: a rectangular one. While Qt itself has built-in supports for linear, radial, and conical gradient types, apparently for office apps we may need more than that. In short, the goal is creating the following:

It turns out that this is not so difficult at all, about 50 lines of code. Check it out at the usual X2 repository and find it under graphics/rectgradient.

Basically it boils down to a two-step process, as illustrated below. The first one is easy, just create a linear gradient from the center going north and south. The second one is similar, but now we are going east and west and clip it to two triangles. Once we combined both, we get the rectangular gradient.

Have fun with the gradient!

Saturday, April 23, 2011

camp kde 2011

Camp KDE 2011 was a fabulous experience. First of all, there is definitely something with me and Camp KDE. The previous one was in San Diego and at that time I was there working for Qualcomm. This year it is San Francisco, right after I moved to the Bay Area.

Videos of the sessions have been published. I contributed two talks there, one is about the (usual) graphics stuff with Qt (video, slides). The other one is a series of demos of web technologies (video, slides).

There are some interview videos as well. If you watch Wade and me, you can spot a little guy there. Pay attention to his shirt :)

The venue can't be better, it's in the center of Japantown. Even better, the weekend after is the Cherry Blossom Festival.

cherry blossoms

Since I don't live in a big city anymore, it's also fascinating to be able to spot a cozy cafe right between all the big buildings. Right in Japantown, we found YakiniQ which serves a must-try sweet potato latte!

latte & croissant

All in all, it was a blast for me. Beside catching up with the people I met before, finally I got to meet folks I only know through our online interaction.

Kudos to the Camp KDE organizers! See you in 2012.

Saturday, March 19, 2011

camp kde in 2 weeks

My first Camp KDE experience was when it was held in San Diego, which was also interesting since at that time, I just moved there.

Just like the planets align themselves, apparent my move to the Bay Area is matched with this year Camp KDE in San Francisco. This time, it is co-located with Linux Foundation Collaboration Summit. For more info, just check the official site: camp.kde.org.

The schedule for the tracks has been finalized, there will be various talks around KDE on Mobile, PIM, and of course Qt. I myself will have two presentations: Introduction to QtWebKit and Efficient Graphics with Qt: Beautiful and Blazing Fast.

See you there!

Saturday, January 01, 2011

X2 from Ofi Labs: wrap-up 2010

X2It got started when I needed a new home for my examples. It has even a nice logo.

sensor

accelerometer viewer for Maemo 5 (Nokia N900).

bouncing ball, where the gravity affects the movement of the ball.

box of marbles, where the gravity affects a bunch of colored marbles.

combining accelerometer and network to do inter-device marbles transfer.

motion and orientation for web applications.

web-based version of marble box.

widgets

morphing clock, where the transition between the digital and analog version is a kind of morphing effect.

qpalette viewer so you know which color is which one.

graphics

fast approximation of Gaussian blur to create a blurry drop shadow.

command-line capture tool to save maps from OpenStreetMap, MapQuest and Ovi Maps.

simple tool to list all chunks inside a PNG image.

webkit & javascript

file processing, including using jslint, in command-line using JavaScript.

play Canvas-based game as normal desktop app.

offline, command line beautifier for JavaScript code, utilizing Qt Script.

another variant of the beautifier, this time using V8.

minimalistic editing widget for JavaScript code, with custom syntax highlighting.

white background is boring? just try some color inverted web pages.

detect the closest link to ease following it on a touch device.

Canvas pixel manipulation for plasma effect.

network

simple proxy server for HTTP, in 100 lines.

tracenet: trap all network requests+replies to show them with Speed Tracer.

filterproxy: another variant of the proxy server with added URL filtering feature.

Tuesday, November 09, 2010

chunks inside PNG

Here is a few minutes of hack which would hopefully help someone else:

pngchunks logo.png
File size: 5967 byte(s)

Offset    Chunk    Size
      8    IHDR      13
     33    iCCP    2627
   2672    IDAT    3271
   5955    IEND       0

Useful to quickly find out if we can further strip unnecessary chunks from the PNG image. Or even as a warming up before you fire your favorite hex viewer/editor.

It's pure, stand-alone, self-contained C code (i.e. compile using gcc -o pngchunks pngchunks.c), available at the usual X2 repository, find it under graphics/pngchunks.

Thursday, October 28, 2010

morphing clock revisited

If you can't see the clock below, visit the stand alone demo.

Technically, I had wanted to wait till it can display the actual time and perhaps ask some designer to polish it. But rather than keeping this lunch-break hack in a safe deposit box forever, let me just release this ugly clock transition (since everyone is on the animation frenzy). So far it works only if you use latest version of Safari, Chrome, Opera, Firefox. Canvas and/or VML fallback (which sadly will require JavaScript) for other browser are in the pipeline.

Basically it is another version of my previous morphing clock attempt (see the video). The principle is the same, except now I modified that C++ program to also output an HTML which renders the clock as above.

Also it morphs only once. Reload the page to enjoy the morphing once more. Maybe I'll find the time (in another lunch break) to toggle the two clock modes. Update: morphing from/to both analog and digital mode is implemented.

Like I said, it's a creepy, machine-generated, ugly looking clock. You've been warned, but feel free to write me anything (should you need to vent your anger).

Wednesday, October 27, 2010

Look ma, no JavaScript!

Take a look at the following CSS 3 demo. No Flash. No JavaScript. No image.

Hungry for more? Enjoy some other demos created using Sencha Animator.

Wednesday, October 06, 2010

color inversion for web pages

Something I worked on during my last few weeks with Qualcomm was color inversion for the web browser in Android. The patch was then integrated by Enrico (see the diff) because I switched job.

Later on this feature was also pulled into CyanogenMod. Thus, if you are running CyanogenMod 6 on your shiny Android device, you can try this feature already! In the web browser, just pick the Settings menu and then scroll a bit until you see a checkbox for Invert Color. You should get something like the captured screens below:

The idea behind this is to reduce the power consumption of Organic LED display, because on mostly-white web page, it hungrily grabs to 3x more power compared to LCD. This is similar to Jeff's trick of applying color filter in SurfaceFlinger.

Doing it at the user-space level gives one advantage: we can keep the embedded images non-inverted. Blindly inverting the entire screen would result in web pages look rather funky, especially those new sites with photos to accompany the articles. Of course, this hackish approach will not work 100%, (hint: double XOR?) since the web designer likely never intend the page to be color inverted. However it seems to work most of the time, at least with pages which do not have ueberartistic look-and-feel.

Faithful followers of my blog know that I already played with the color inversion ages ago, in the form of giving night mode appearance for QWebView. Thus, it happened that in one afternoon break I played with QtWebKit to do something similar to this selective color inversion.

Now, in the case of Android WebKit, the effect was rather easy to achieve. This is because Skia's SkCanvas is basically an interface which can be subclassed easily, while none of the functions in QPainter is virtual. The trick using Skia was to use a proxy canvas (a slight variation of Skia's built-in SkProxyCanvas) which I invented for this purpose but somehow also useful for another feature.

For QtWebKit however, we need to tweak it with some QPaintEngine voodoo. Check out the code at the usual X2 repository, find it under webkit/nightcapture (it still has some rooms for improvement, left as exercises for the adventurous readers). For simplicity, I made it as capturing tool so you need to pass a URL and the output filename. Unless you do something wrong, expect to get something like this:

The trick is the same as my approach for the Android patch: invert the colors of each image before drawing it, at the end invert the entire viewport. This seems like slow, but it's the best compromise I found out working with most sites. Note how we skip inverting any brush pixmap as usually brush is for the tiled background (and thus we want to keep it that way, i.e. not inverted). You can do some fancy magic with clipping and whatnot, but I doubt the end result is much better. Again, this whole stuff is a hack anyway and there will be always corner cases which will not work, no matter what approach you pick, thus there is no need to make it more complicated that it should be.

Just like they say, we code for life, i.e. the battery life.

Friday, September 24, 2010

invade & destroy

Developing games using HTML5 Canvas and JavaScript is simply the future. Something classic like Egor Balishev's RGB Invader, an entry in the 10K Apart, is usually my favorite.

If for some reasons (which I would not elaborate in this post) you need to deploy the game as a desktop or a mobile application, using Canvas and JavaScript gives another advantage: just package it with WebKit, for example QtWebKit if you do not mind using Qt.

However, since usually it is just about Canvas, often it is enough to run the game logic with a JavaScript interpreter and use some Canvas implementation for the display. This was something that I demonstrated before, i.e. running the Monster Evolution demo via JavaScriptCore and V8. Applying the same technique, and adjusting the shim so that it layers whatever RGB Invader requires, gives the following:

Basically it is using Qt Script (also in attempt to popularize it even more) along with a mix of C++/QObject and JavaScript machinery to fool the game code to think it's running in a browser environment. It was a nice afternoon fun project.

The code is in the X2 repository, find it under the javascript/invader directory. Get it while it's hot, and save our Earth!

Monday, September 13, 2010

capture OpenStreetMap and MapQuest (and Ovi Maps)

Over a year ago, I showed how to render OpenStreetMap on your Qt application. While there were few follow-ups after that, I never found some time to clean it up. But worry no more, here is one OpenStreetMap-related example (at roughly 250 lines of code) I just made public, freshly available from X2 repository under the graphics/mapsnap. It's operated from command line, basically you pass the center latitude and longitude, zoom level (1..17, with 17 is the detailed, street-level zoom), output filename (e.g. mymap.png), and the size.

The following image is the result of running:

mapsnap 37.45108 -122.15917 12 sample.png 600 450

The tool will grab the tiles, more precisely Mapnik-rendered tile images, and stitch them for the final outcome:

Few weeks ago I wrote about MapQuest embracing OpenStreetMap. One positive impact of this awesome move is that you can show OpenStreetMap-based MapQuest tiles in your application. It's just the same map data but rendered using different styles. Running the previous example but with MapQuest flavor gives the following:

When checking out Qt Mobility after its 1.1 TP announcement, I found out that its Maps/Navigation API actually uses the tile data from Ovi Maps. If you read the source code, the tile server encoding scheme is pretty obvious. Since it is also based on Mercator projection, changing this MapSnap example to use tiles from Ovi Maps is a breeze: it's a matter of setting up the correct tileURL.

I'm curious about the terms of such Ovi Maps tile usage, though. Although it is more or less "exposed" via Qt Mobility and there is no API key whatsoever, surely it should not mean the tiles are free for everyone, should it? As a comparison, Google Static Maps API specifically allows only browser-based application. Feel free to share your investigation!

Thursday, September 09, 2010

the art of blurring the shadow

In the recent weeks, sporadically I have been working on QtWebKit to fix the missing blur support for Canvas and CSS shadow (see the tracking bug 34479). This brings some good memory; before I left Nokia, I was involved in prototyping the special effect stuff, both for the low-level (non-public) QPixmapFilter and the high-level QGraphicsEffect.

Usually blurring drop shadow for a shape is a very typical: grab the alpha channel of the shape, apply the blur filter, and finally tint it with the intended shadow color. The last step is trivial using the SourceIn composition mode. The blur filter is supposed to follow the SVG specification on feGaussianBlur. The said specification mentions one possible way to approximate the perfect Gaussian blur: three successive box blurs.

Since QPixmapFilter is private anyway and QGraphicsEffect is not suitable for this task, an attempt to implement what the specification outlines became my hobby for a few evenings. This is basically what emerges as the shadow blur implementation in QtWebKit. For the sake of code reuse, I pushed the implementation to the X2 repository under the graphics/shadowblur subdirectory. The shadowBlur() function itself is BSD licensed, there is a demo program included for your pleasure:

Performance-wise, the code is as satisfactory (for such a portable implementation). Another good approach is to use stack blur, adopted among others by AGG. KHTML notably uses stack blur for its Canvas shadow blur support. Exponential blur is known to be very fast, although quality-wise it deviates farther from a true Gaussian one. The portable, raster version of QGraphicsDropShadowEffect (via QPixmapFilter) is using this algorithm.

For this particular use-case, namely blurring the shadow (as opposed to generic blur filter), I'm surprised that the Gaussian blur approximation is not necessary slower than KHTML's stack blur approach or even QGraphicsDropShadowEffect's exponential blur. I did a quick benchmark, measuring the time spent creating the shadow for two images (horizontal 149x13 and vertical 13x149) for different radii (small 4px and medium 17px), on a Core i7 machine. The outcome is shown in the following bar chart. The result was from several runs, with the overall confidence level observed to make sure it was statistically sound. Still, take it with a pinch of salt.

With a very large blur radius, e.g. 50, stack blur performance deteriorates quickly, probably because the pre-loop initial setup. Exponential blur is pretty much radius-agnostic, although I can't find cases where it wins against my shadow blur code (which is BTW only 60 lines). Larger source images would highlight the performance difference even more. Maybe I am doing something wrong, or maybe that's how it is. In any case, I insert a low-priority entry in my (already infinite) TODO list: spend some quality evenings with callgrind and examine those blur implementations.

On mobile devices however the situation is reversed. The approximated Gaussian blur is consistently slower, around 10%, compared to exponential or stack blur, when tested on 600 MHz Cortex A8-powered Nokia N900. Due to slower memory speed and smaller cache, the repetitive memory access for the successive box blurs cancels its fast processing benefit. Hopefully the 1 GHz generation CPU (like in Nokia N8) and improved memory bus will eliminate this minor slow down.

Anyway, in all cases, just like Andreas mentioned, now you can enjoy the fancy Parcycle demo in its full glory:

Tuesday, May 18, 2010

Quake and WebGL

While I'm there, let me just quickly blog about it. Using the developer version of Chromium on OpenSUSE, I just run it with the following arguments:

/usr/bin/chromium --enable-webgl --in-process-webgl

and then I have WebGL at my fingertip. You can test it with some O3D samples (the pool one is pretty cool).

In fact, just go ahead and play Quake II at http://playwebgl.com/games/quake-2-webgl/.

I got bad FPS because I own a cheap laptop (8 FPS is more than what I expect from a $330 box). Obviously you can get 25 FPS or more on a much better machine!

Sunday, May 09, 2010

vittoria: tiger in color

Continuing from the saga I started some time ago, at least now I got to the point where it's rendered anti-aliased in full color:

Stay tuned, I'd clean-up and release the code soon-ish.

Thursday, May 06, 2010

vector graphics, tiger in wireframe

At the risk of starting another yet-will-be-unmaintained project, sometime ago I decided to continue learning about graphics stuff in my spare time. I will not announce it of course until its code is better for public consumption. However, I really can't contain my excitement when it reaches an important milestone:

This sounds like childish, but as a graphics n00b, the above screenshot means a lot to me.

Stay tuned!

Saturday, March 20, 2010

morphing clock

As I promised before, here is a fresh X2 example. Those who attended Bossa Conference 10 and followed my talk are lucky to have seen it for the first time there. In fact, this example is ridiculously simple that I am not surprised at all if somebody has done this ages ago.

Let's start with a screen capture, or two:

Basically the above shows an analog and digital clock running on my Nokia N900, hardly a shock. However, the fun part is when you switch the clock from analog to digital and vice versa. Check out this video, or watch directly on YouTube, courtesy of Signor Portale from Nokia/Qt, showing the morphing on Nokia 5800:

The trick is simple. Actually it's not even generic enough, meaning that you can't morph from an arbitrary path to another arbitrary path. However, for this clock use-case, the gross approximation is good enough. First, we need to convert the path into a polygon, which is done easily via QPainterPath::toFillPolygon() function. Then any line segment in the polygon longer than a certain tolerance is further split into smaller segments. As I claimed above, the result is not perfect, i.e. it does not approximate the original path into line segments with equal length. But hey, it is good enough for this animation purpose (unless your user has ueberhuman eyes).

The target path needs to be sliced into segments as well. Since we have only two types, circle (for the analog clock frame) and solid block (for the hour and minute hands), it is easier to special-case both. The secret is to have the same number of segments as the source path. The following figure shows the digit '7' and a circle, each splitted to 28 line segments. Small dots indicate the start and end points of those segments. The animation is now a matter of doing tweening, or linear interpolation, between each segment.

The flaw of this trick is when the source path contains holes inside it, e.g. for digits like 0, 4, 6, 8, and 9. Again, we are cheating here for the sake of keeping the code simple, so I leave the code as it is. Doing a more advanced, better handling for those cases is left as a motivational exercise for the perfectionist readers. Another bonus puzzle: find out why 503 ms is the morphing time (hint: find the same number in Qt source tree).

The code is in the X2 repository, check the sub-directory widget/morphingclock. You need Qt 4.5 or later. It is not long at all (surprise!), sloccount reports 191 lines of code. A morphing-clock plasmoid is also underway, just be patient.

For the sake of completeness, let me mentioned Dali Clock (even in Canvas and JavaScript version) from the famous Jamie Zawinski (jwz). It is similar, however Dali Clock just morphs the digits of the digital clock.

Also, if you just prefer a normal (but old-fashioned!) digital clock with the flipping effect, check the digiflip example I did back then. You already have it if you install Qt 4.6 for Symbian.

Last but not least, I'd like to mention my "special thanks to Delta Airlines for such a long (but safe) flight to Brazil so I had the chance to write this example while I was bored", but then I was told by the Trolls that this kind of intro line can't be funny anymore.

Thursday, March 11, 2010

new X2 logo

I got few proposed designs after I announced X2 project back then. It is tough to pick the winner cause they are all very good. In the end, the one from Elvis Stansvik becomes the new official logo of X2:

Thank you to everyone who has sent me the logo design!

Monday, March 08, 2010

manaus and bossa conf

Right now I am in Manaus, in the middle of the Amazon, Brazil. Good weather, beautiful nature. Fresh tropical rain, feels just like home.

Yes, I am here for the (legendary) Bossa Conference '10 from the awesome INdT folks. I had delivered my talk, Redefining Mobile Graphics Stack this morning. I used the chance to preview (and got feedback) some of upcoming graphics example for X2 from Ofi Labs (what's X2? read the explanation), even straight from my N900, so just watch its git repository in the next few weeks. BTW, Radeon HD 3200 of my new toy and TV output of N900 worked out-the-box with the projector.

It is also nice to meet few INdT guys I knew, and get to know new folks as well. Since a few Trolls are also here, I also catch up (and share more jokes) with them. Gosh, feels like ages since I left Oslo.

This is my first visit to Brazil. Looks like it won't be the last time!